
If you want to make something special out of your lettering, adding shadows is a great and also a simple idea.
I will show you how you can create shadows, how you know where to add them and I will also show you some different kind of shadows you can add to your lettering.
Contents
Why you should add shadows to your letterings
A plain lettering can already look great, but I promise: If you add some shadow to it, it will even look more stunning.
A shadow helps you, to pop out a word and gives it a special effect, even if the shadow is only small and light. Shadows can make a letter “getting alive” and it looks more realistic.
If you look around you – every single chunk around you has a shadow. So why not your lettering?
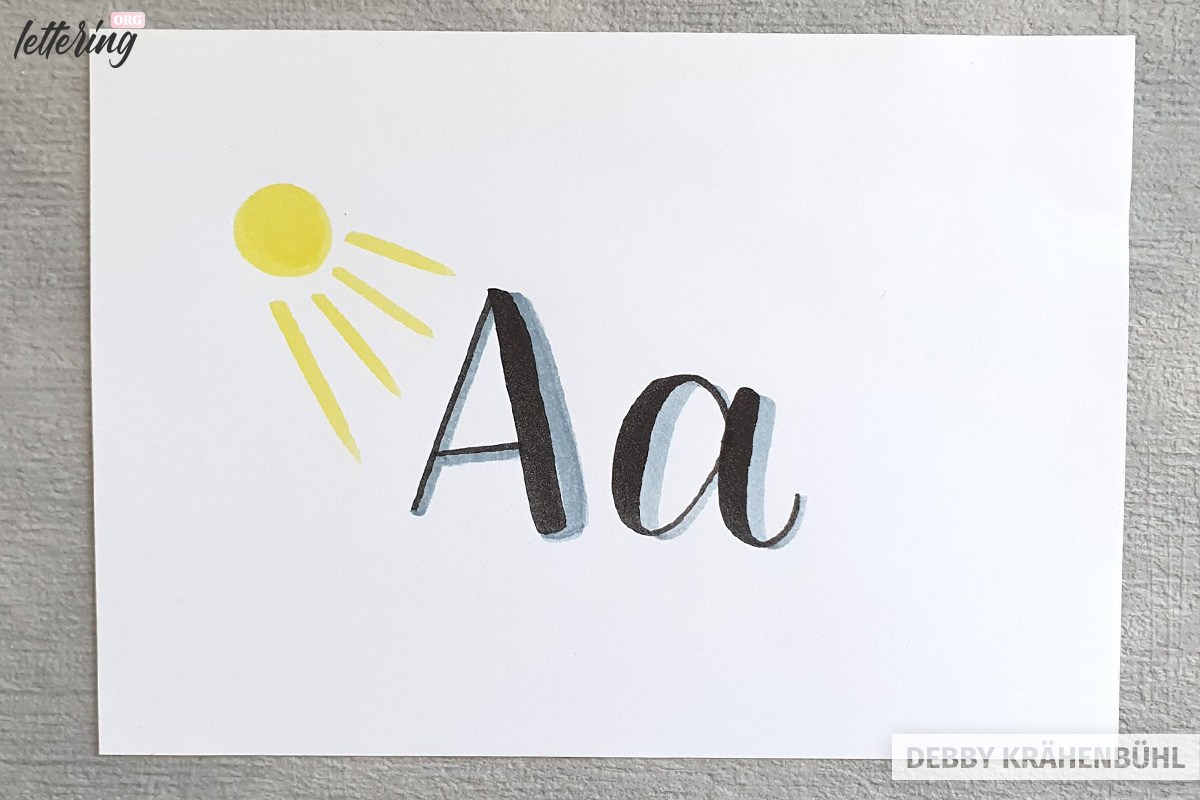
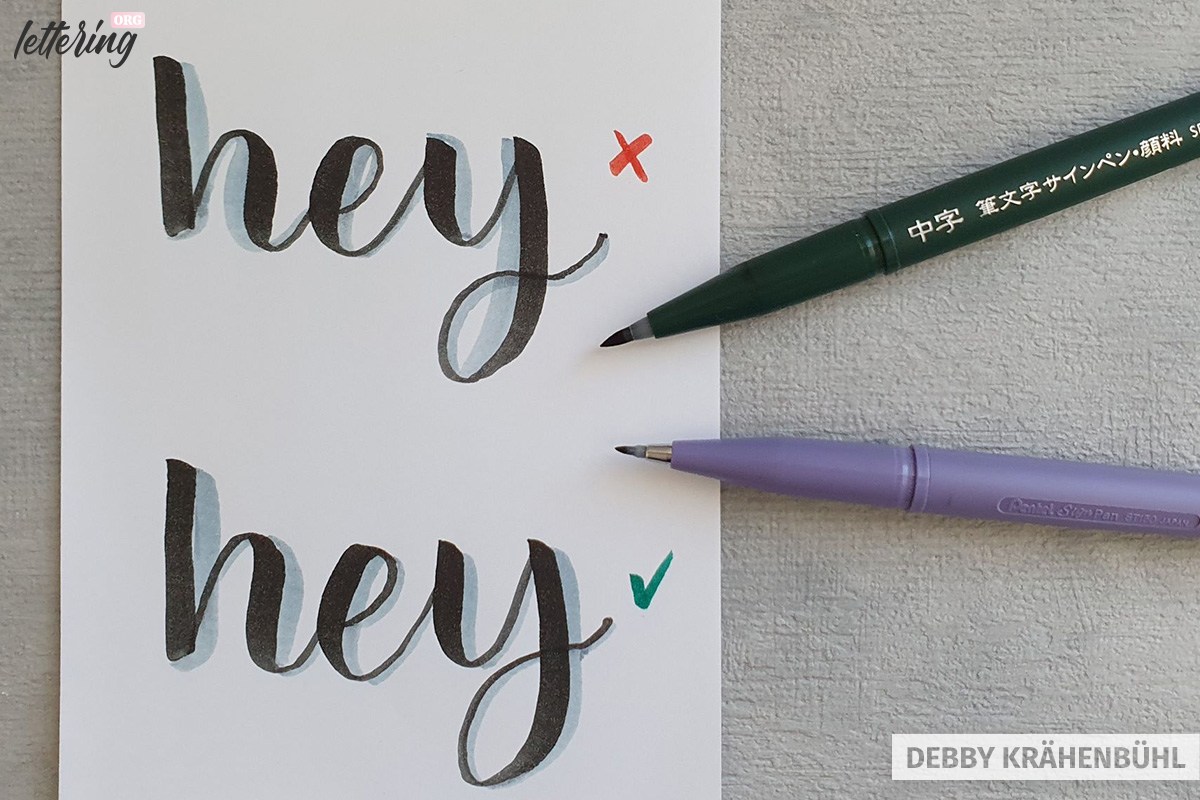
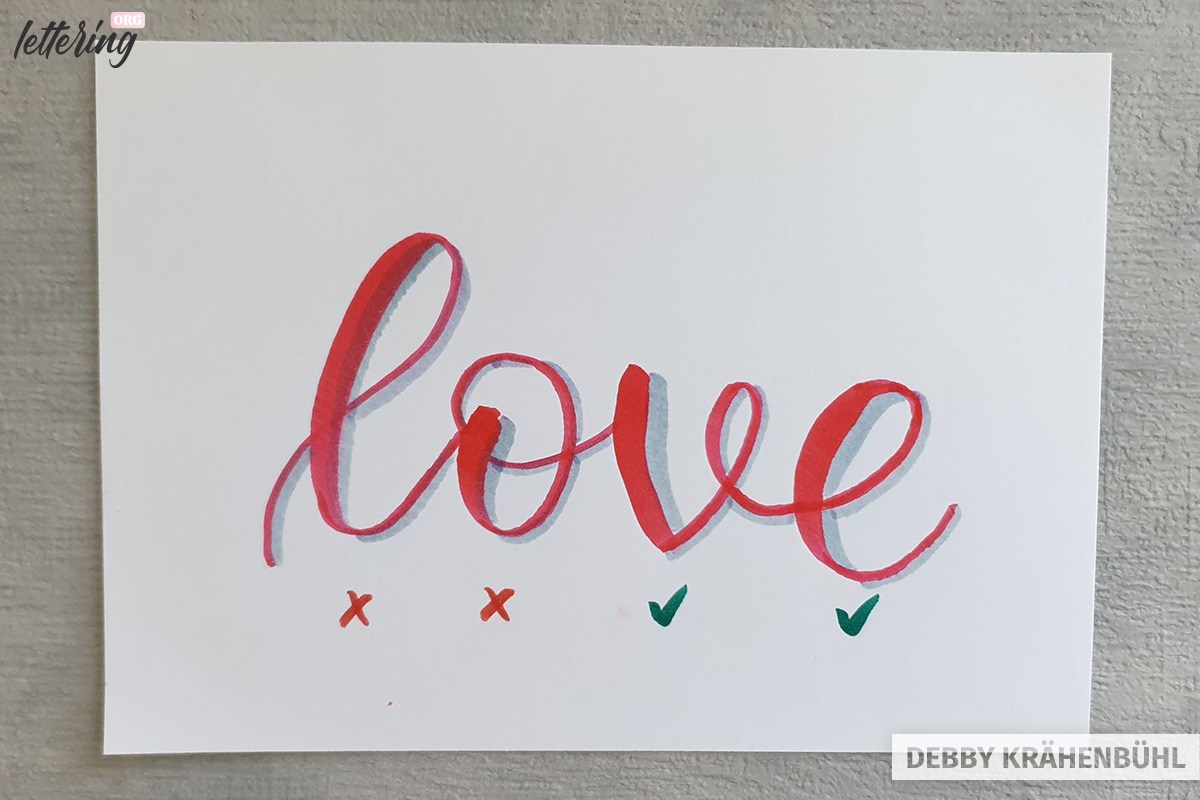
Have a look at this picture: It is a very simple brush lettering, but I think you will also prefer the one with a shadow, won’t you?
It just looks more special – even if it’s “only” the shadow I added to the word shadow. But it looks quite better than the word love:

Where to add the shadows
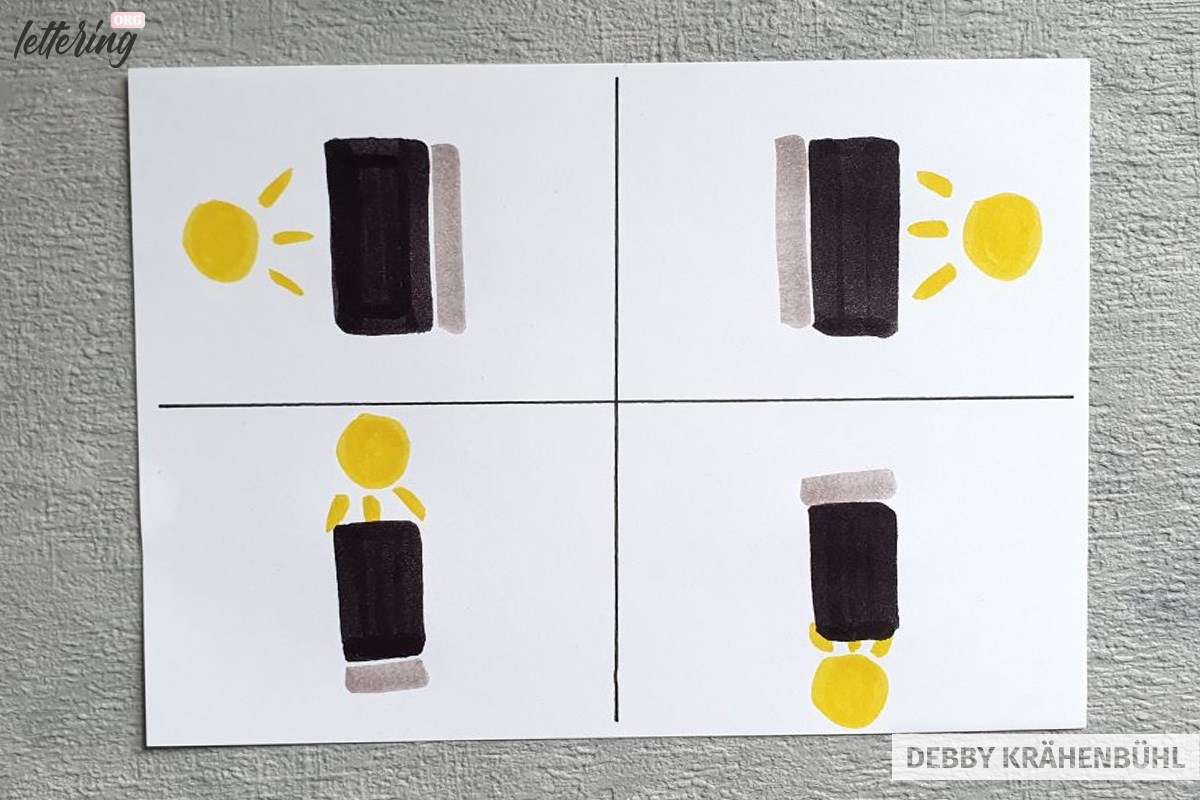
The most important rule is the source of your light. Every single time when you want to add shadows to your letters, you have to decide, where your light is coming from.
You have to make this decision at the very beginning.
Shadows are the opposite of the light. So in the area of your letter, where the light can not get to, there you will add shadows.
We can have our source of light on every side of the letter we want to. You can just choose – do you want to have the shadow on the left or at the right side?
Of course you an also decide to get your shadow on top or at the bottom of your letters. So if we just paint a simple box, the shadow is at the other side of the box than the light.
If we transfer this easy variation on to our letters, we just add some shadows on one side of each letter. You can decide here either, if you just add it to your downstrokes or if you will add some shadows also to your upstrokes, that’s up to you.
Even if you decide to add shadows only at your downstrokes when you do some brush lettering, that looks already great. This is a very simple but effective way to let your lettering look more special.
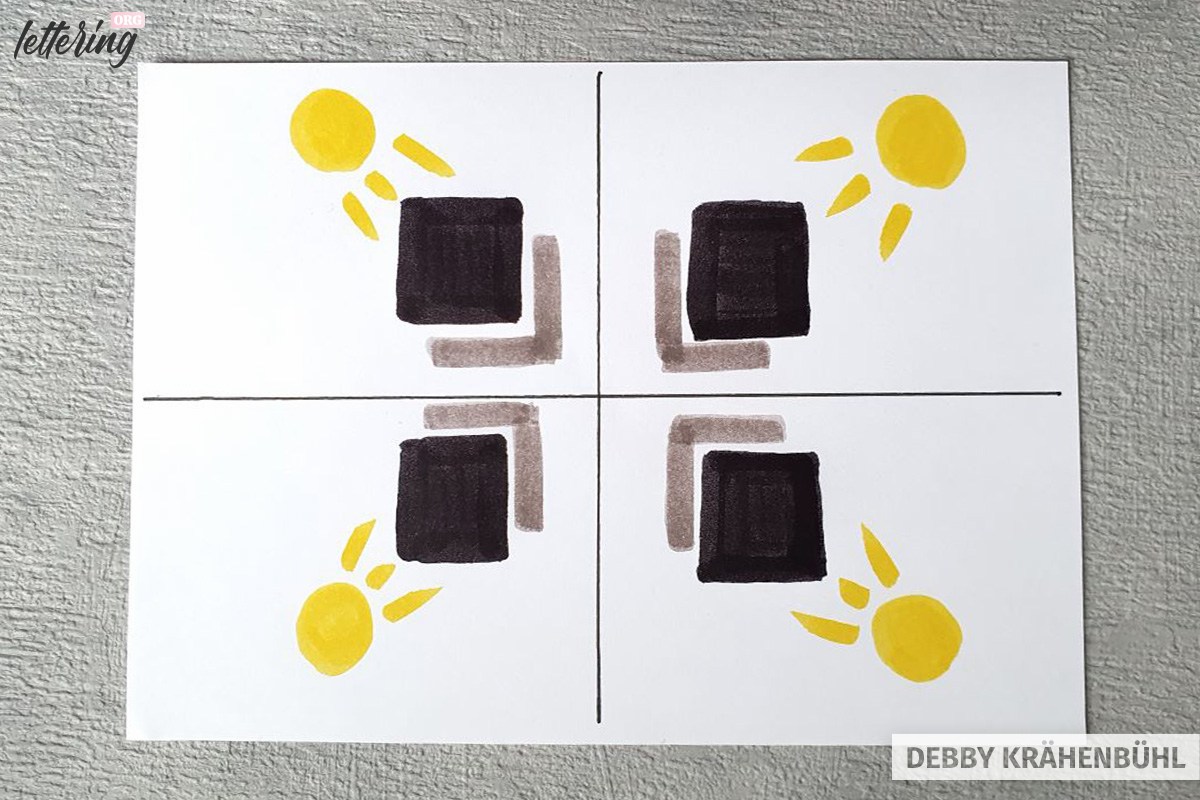
But we can also add shadows on two sides of the letters. Most of the times, the light source is coming from the edge, so we have two sides of the letters to add shadows.
Most people like one kind or one side of adding shadows the most. Just try the different versions and you will see, which one is easiest for you.
Especially for beginning, you don’t have to be a pro with shadows. Just decide one side – and train this side. And when you continue to add shadows to your letterings, you will see – it will always get easier.
Take care: The most important thing, when you add shadows to your letters, is the consistency. Choose one side and keep that side throughout your lettering.
Stay at the same side with your shadows throughout your whole lettering piece.
Tips to know where to add shadows
If you are not sure, where exactly you have to add your shadows to your letters, I have two tips for you.
Shadows with tracing paper
Write your lettering as you always do on a smooth paper. Then put some tracing paper over your lettering and write exactly the same word again, just in another colour. Try to write it in the same size and shape as you lettered your word first.
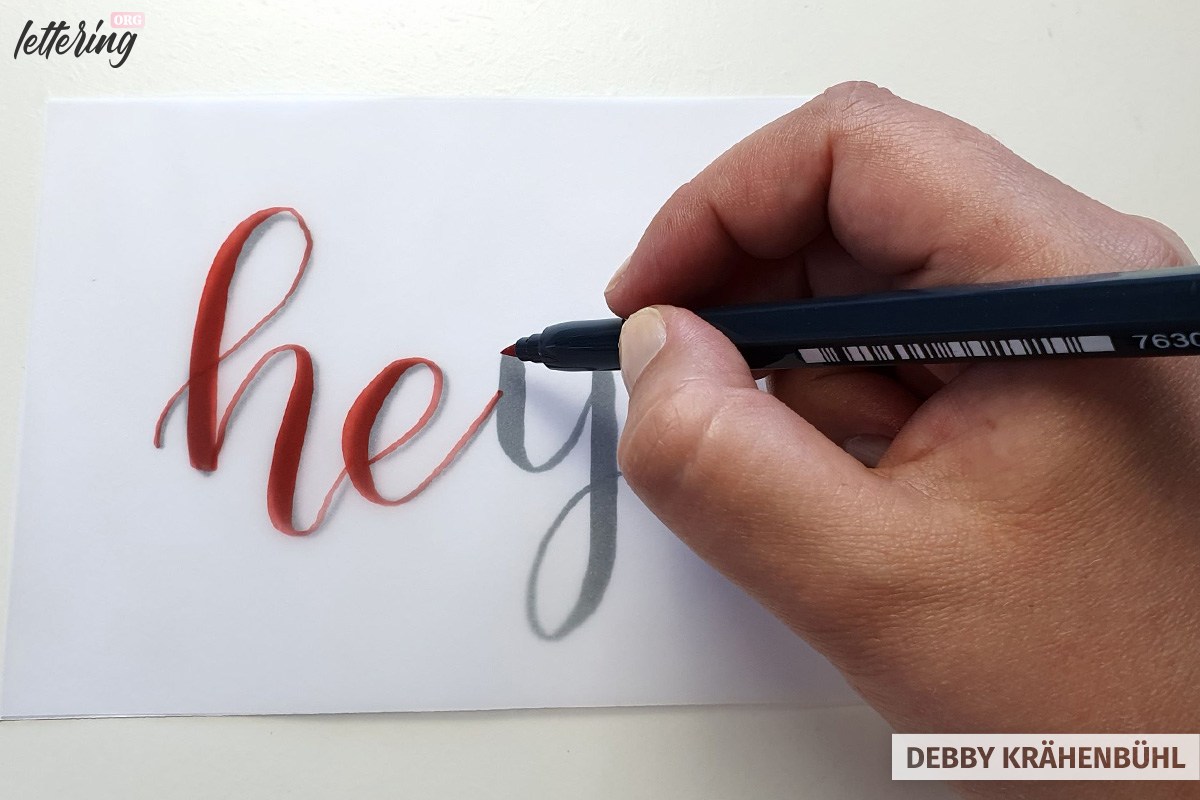
You have now two times the (almost exact) same lettering. Decide now, where you will have your light source and move the lettering on the tracing paper in the opposite direction. Now you see exactly, where the shadows of your word has to be.
In this example, I moved my tracing paper to the right and down side:
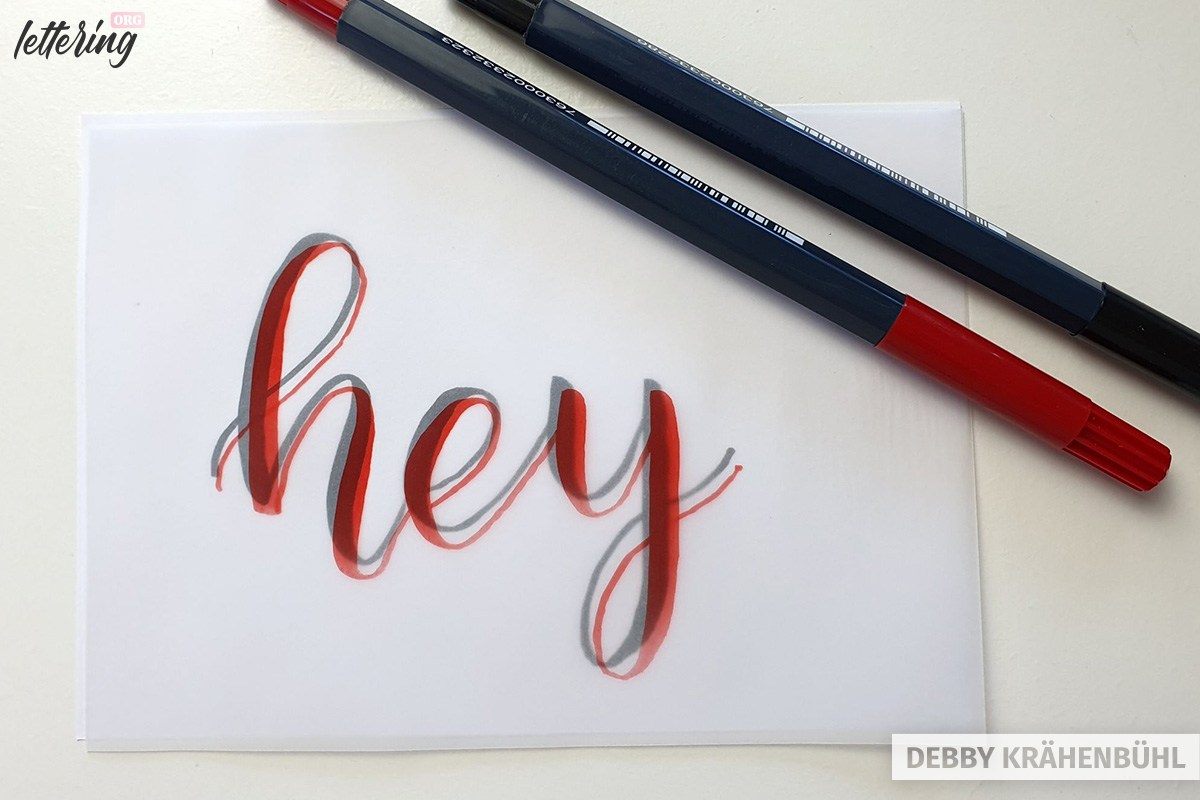
And yes, it is normal that you have some gaps between the light upstrokes. This method just helps you to know and see exactly, in which position you have to add your shadow strokes.
Shadows with procreate
Maybe you have an iPad and you sometimes also letter with the app procreate. There it is also very easy to check out, where to add your shadows.
Just duplicate your lettering, add some different colour to one of the words and then move the lower level of the word.
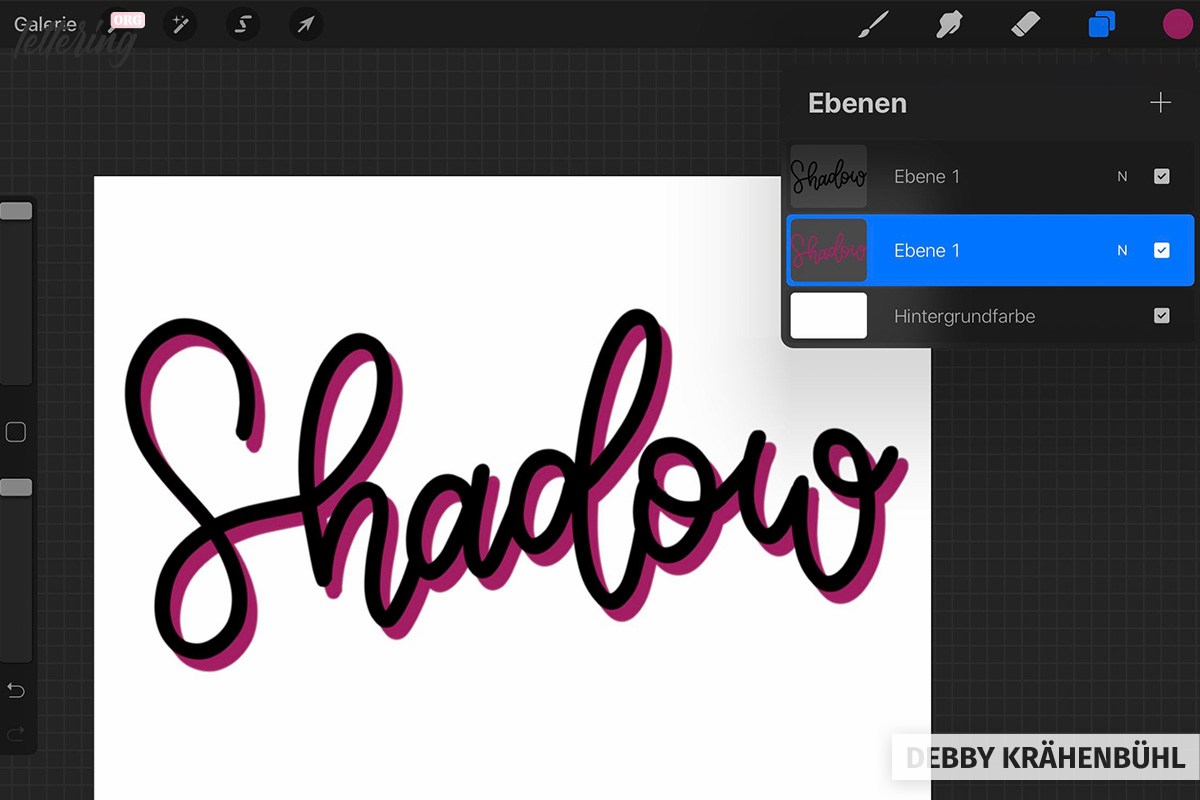
With procreate it is very easy to change the shadow. You can for example easy change the colour of your shadow and also the position of the light source. Just with a few clicks.
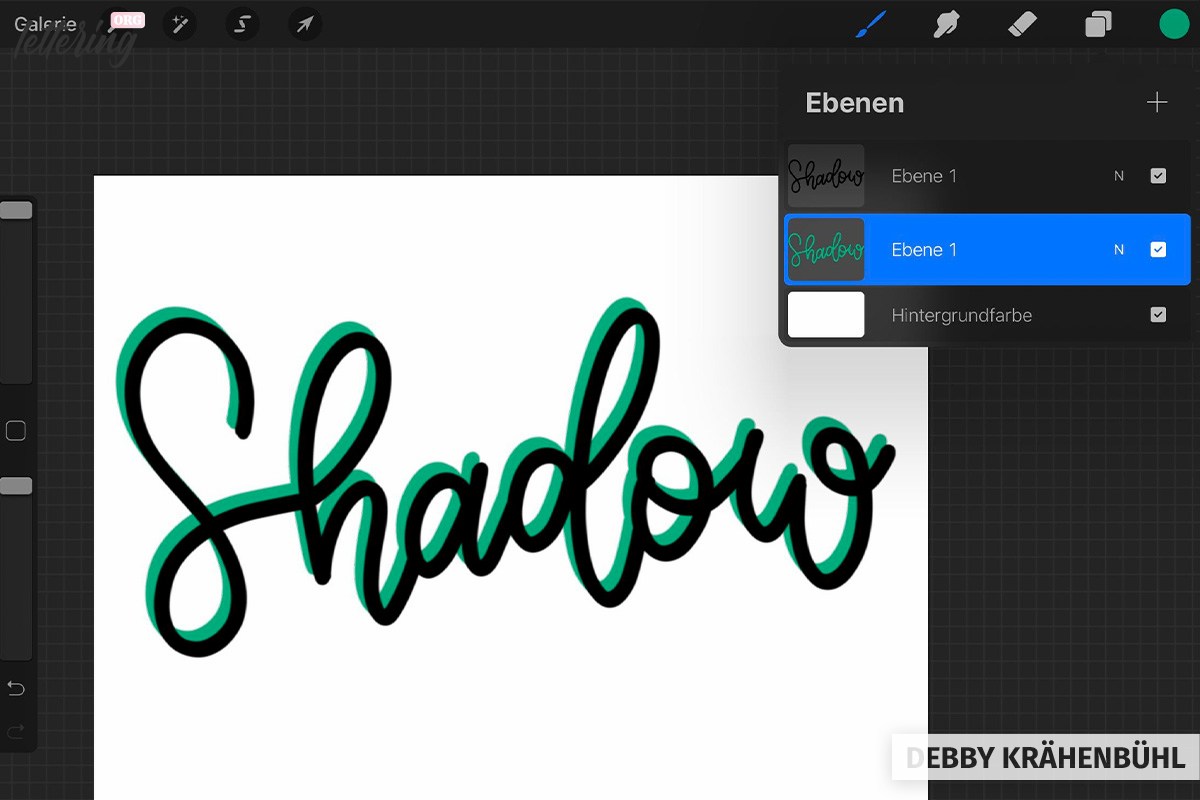
Shadows do have the same form as your original lettering. They are just moved to the side where there is no light.
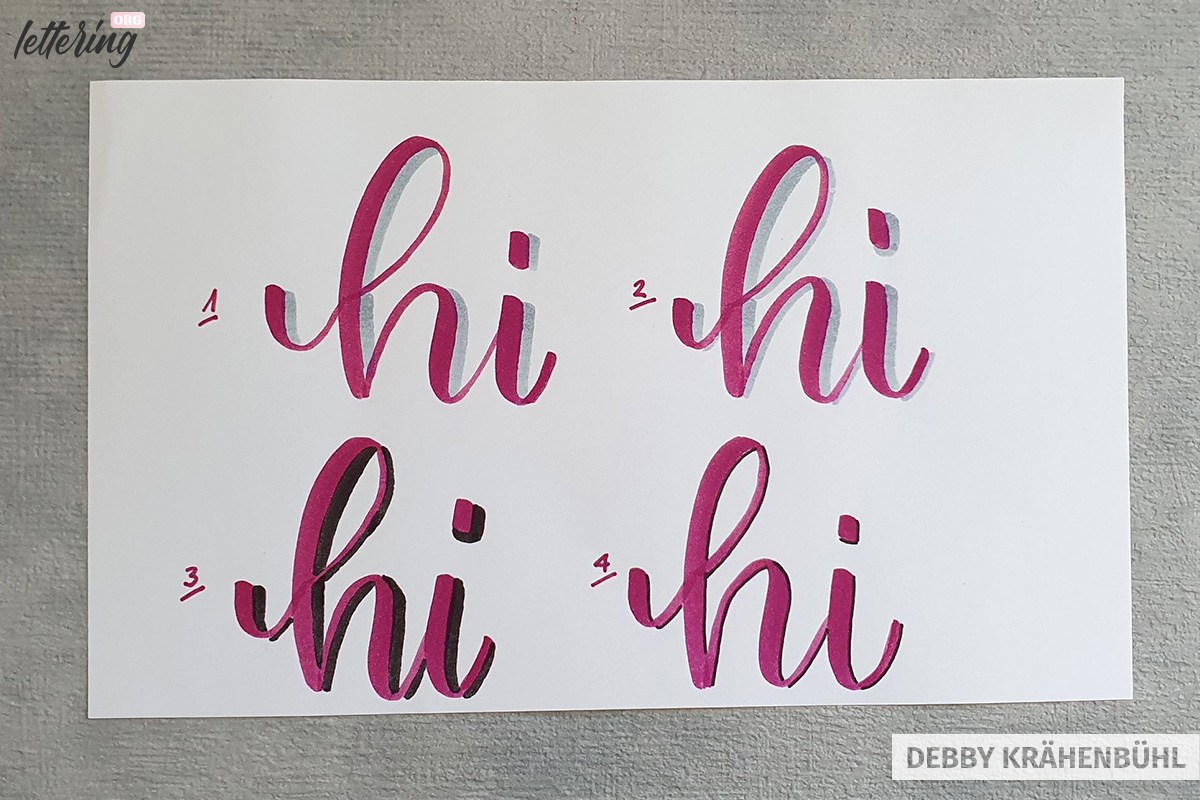
Different kinds of shadows
The most typical kind of adding shadow is with a grey brush pen. But this is absolutely not the only way how you can add some shadow to your lettering. I will show you here some different ways and ideas, how you can add shadows and so pop out your lettering.
- Add some shadow with a grey brush pen just on the down strokes of your lettering.
- Add your shadow with a grey brush pen all around your lettering.
- Add your shadow with a black brush pen.
- Add the shadows with a black monoline pen and stay close to your first letters.
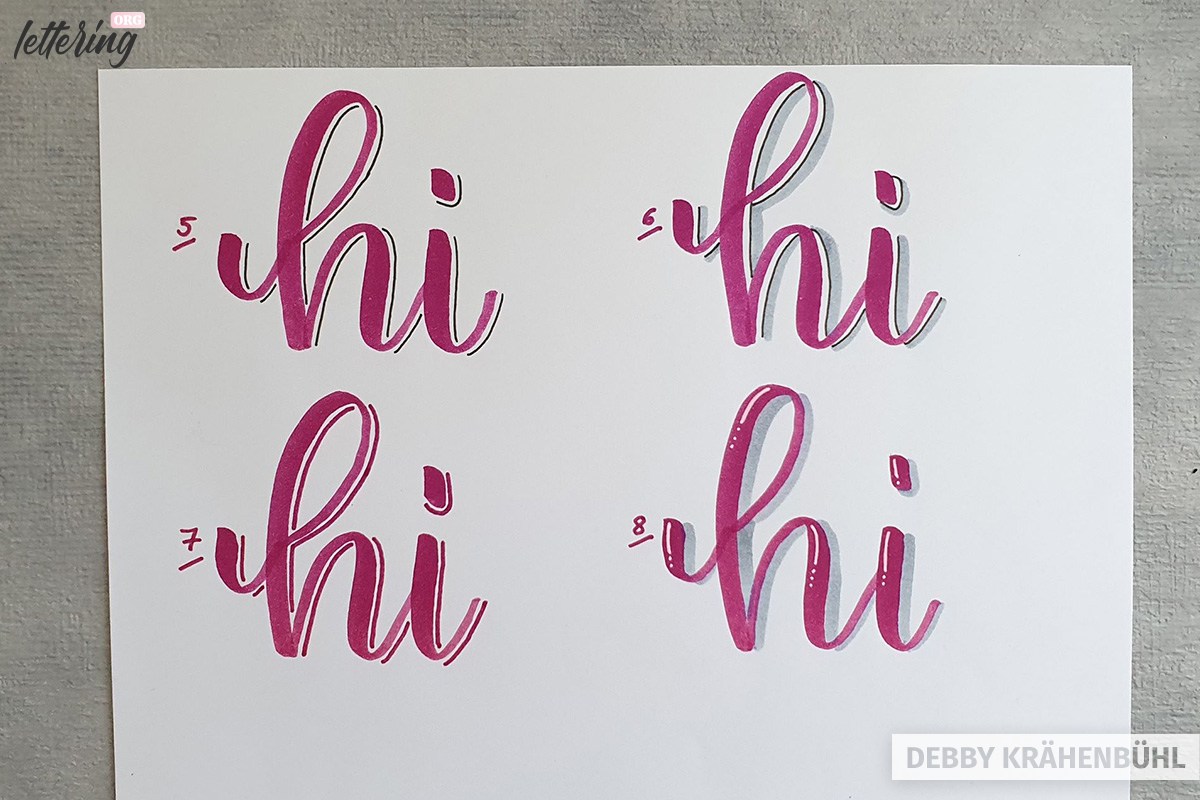
You already see in these variations, how different a lettering with a shadow can look. So – always think about: What do I want to say with this word? Then, choose your different kind of shadow to add.
- Add some shadow with a monoline pen, but leave some space between the letter and the shadow line.
- Add the shadow with a monoline pen as in number 5. Then in addition, put with a grey brush pen some more shadow.
- Add some monoline shadow with the same color of your brush lettering. Also leave some space between the letter and the shadow line.
- Add a shadow with a grey brush pen. Additionally, you put in these variation some highlights – some light with a white gelly roll. The important thing here is, that you add the highlights on the opposite side as you have added your shadow.
Lettering with shadows – never forget:
So you have now a lot of opportunities to add shadow to your letterings. You also know how it works and what rules you have to follow. But – very important – always take care of these things:
When you have chosen one side, where you will add your shadow, you have to stay on the same side through your whole lettering.
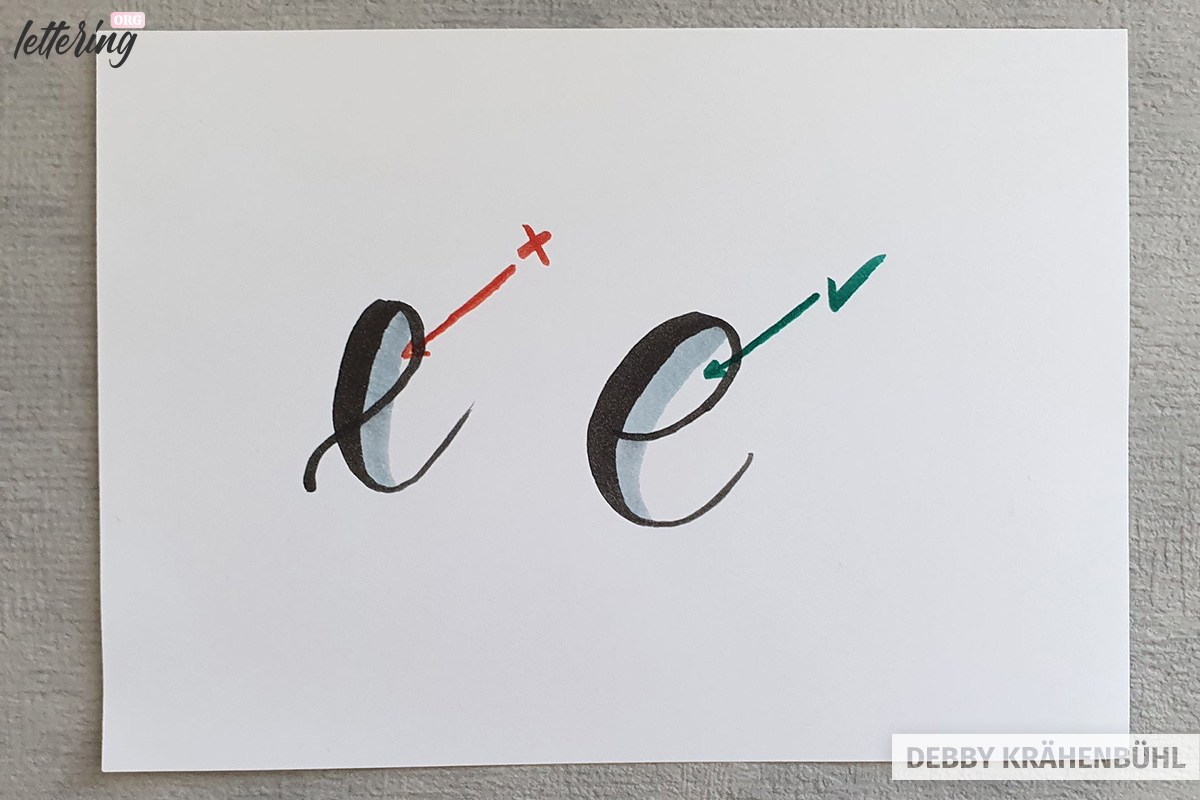
Take care, that you don’t make your letters too small. When you add for example a shadow to an “e”, there still has to be some white space inside of the letter.
Adding a grey shadow on a black lettering, you will probably not have some big trouble. But when you add some shadow to a colorful lettering, take care that you add the shadow carefully.
When adding shadow to a colour and you overlap the colour of your letter and your shadow, you will see this. So just letter carefully.
Have a lot of fun for your next lettering with shadows – enjoy the amazing impact!
And of course – everything I showed you here with adding shadows on brush lettering also works for any other kind and style of hand lettering. Just try and be pleased about the effect.
Very clear instruction!! It helped to see correct placement of shadows next to mistakes. You certainly helped me.
Thanks!
Thank you very much you explained it simple and actually made it fun and experiment with shadowing
Thank you so much I think I’m going to enjoy this .. is there a link to what pens to use please
I’ve already painted my letters 😢 how do I add depth or shadow etc without ruining my painting please help 🥺