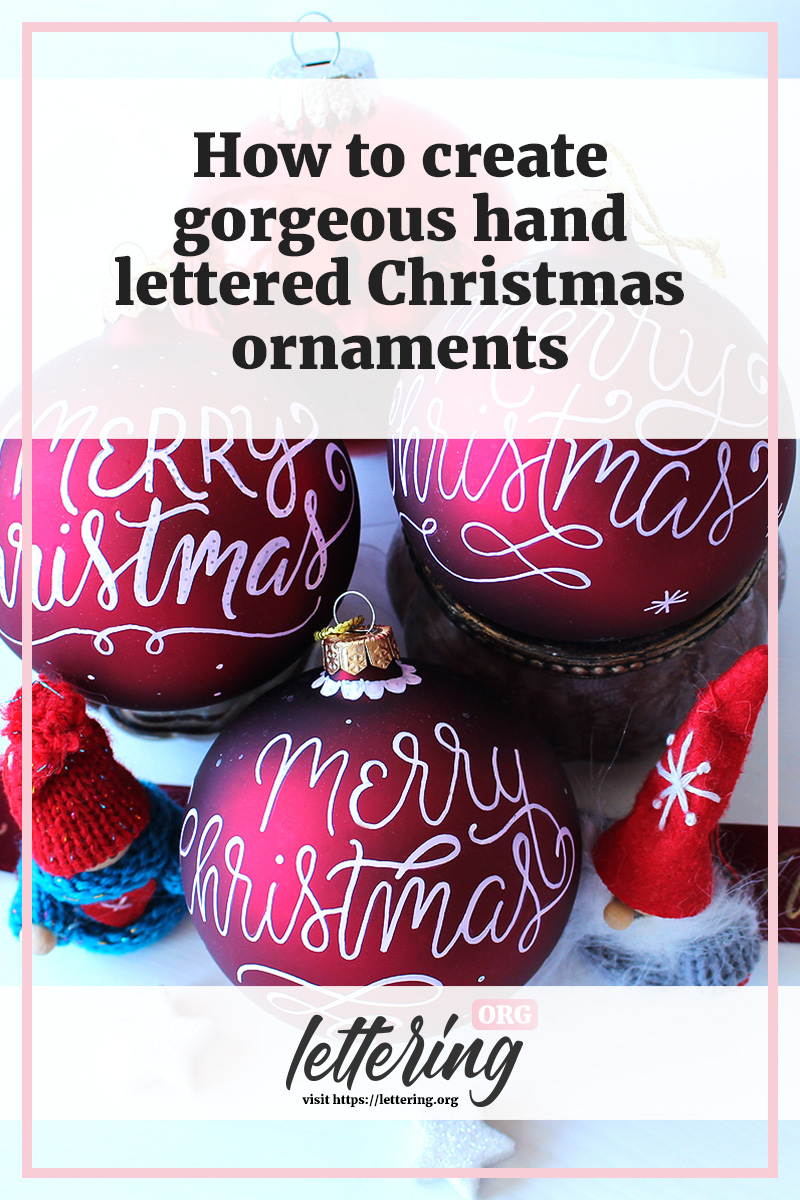
Do you love Christmas, decorating your home, preparing presents for family and friends and/or embellishing your festive table with heart-warming accessories? If you need tips for perfectly using your hand lettering skills for the Christmas season, this tutorial is for you!
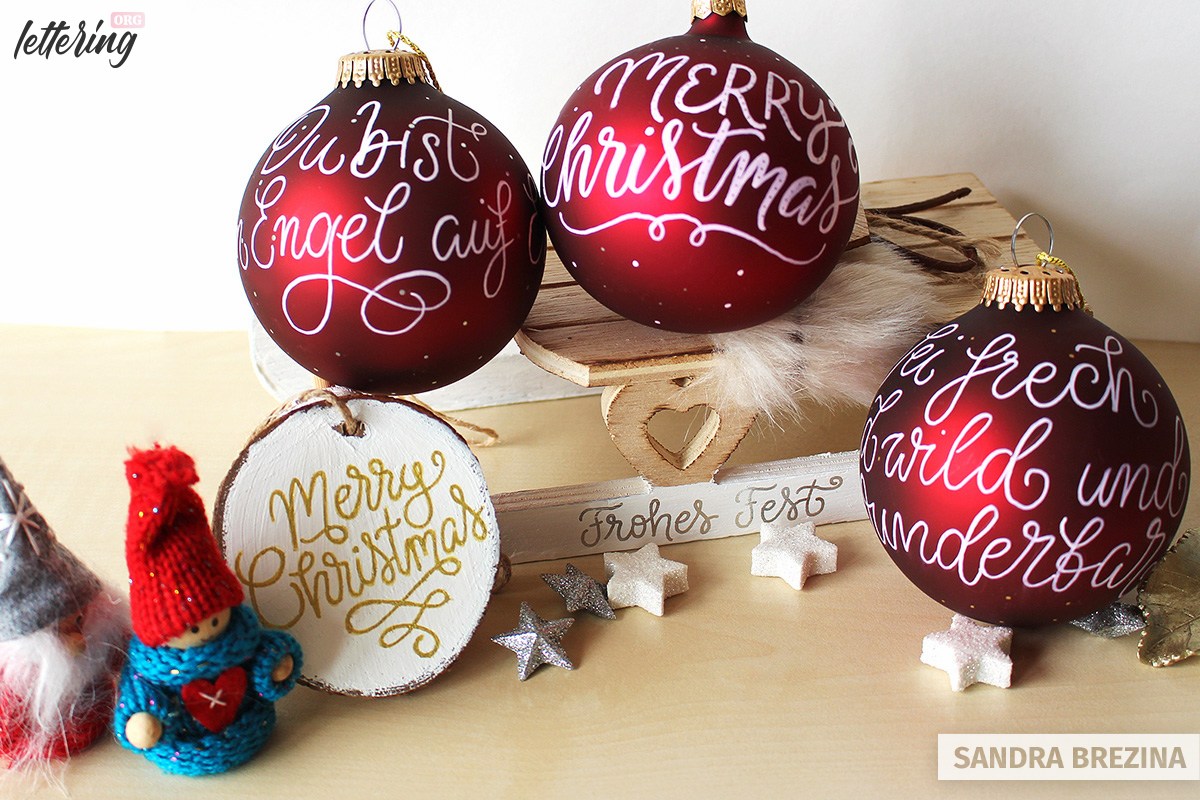
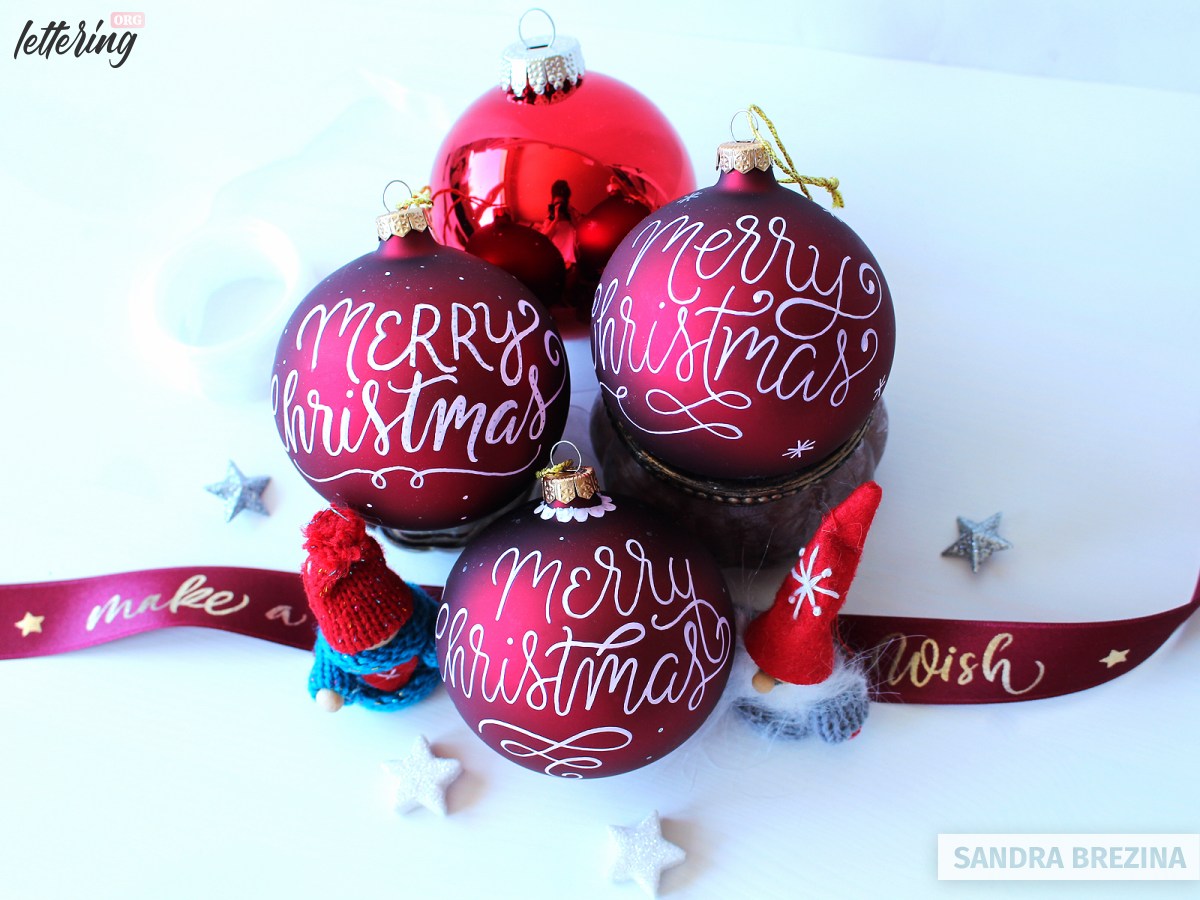
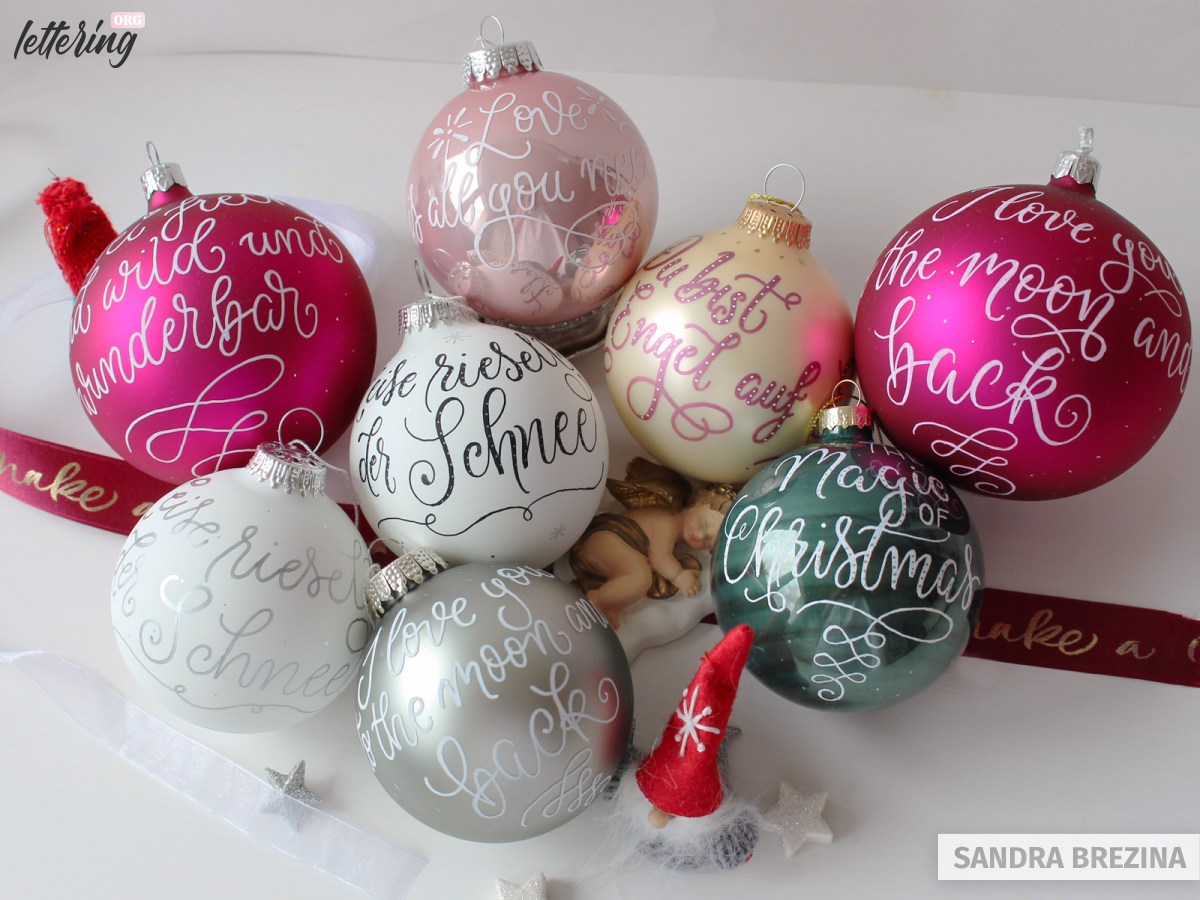
Hand lettered Christmas ornaments are amazing decorations and lovely handmade gifts. What could be nicer than surprising your guests with personalized Christmas ornaments carrying their names or insider words? Last but not least, they are a lot of fun to make and not very expensive.
In this tutorial, I’ll be showing you several options to apply monolinear hand lettering and/or faux calligraphy on your ornaments.
Furthermore, I prepare you with a supply list and show you my favourite tools. The last step is optional. I am going to show you my process of creating your own handmade Christmas gift wrap.
Contents
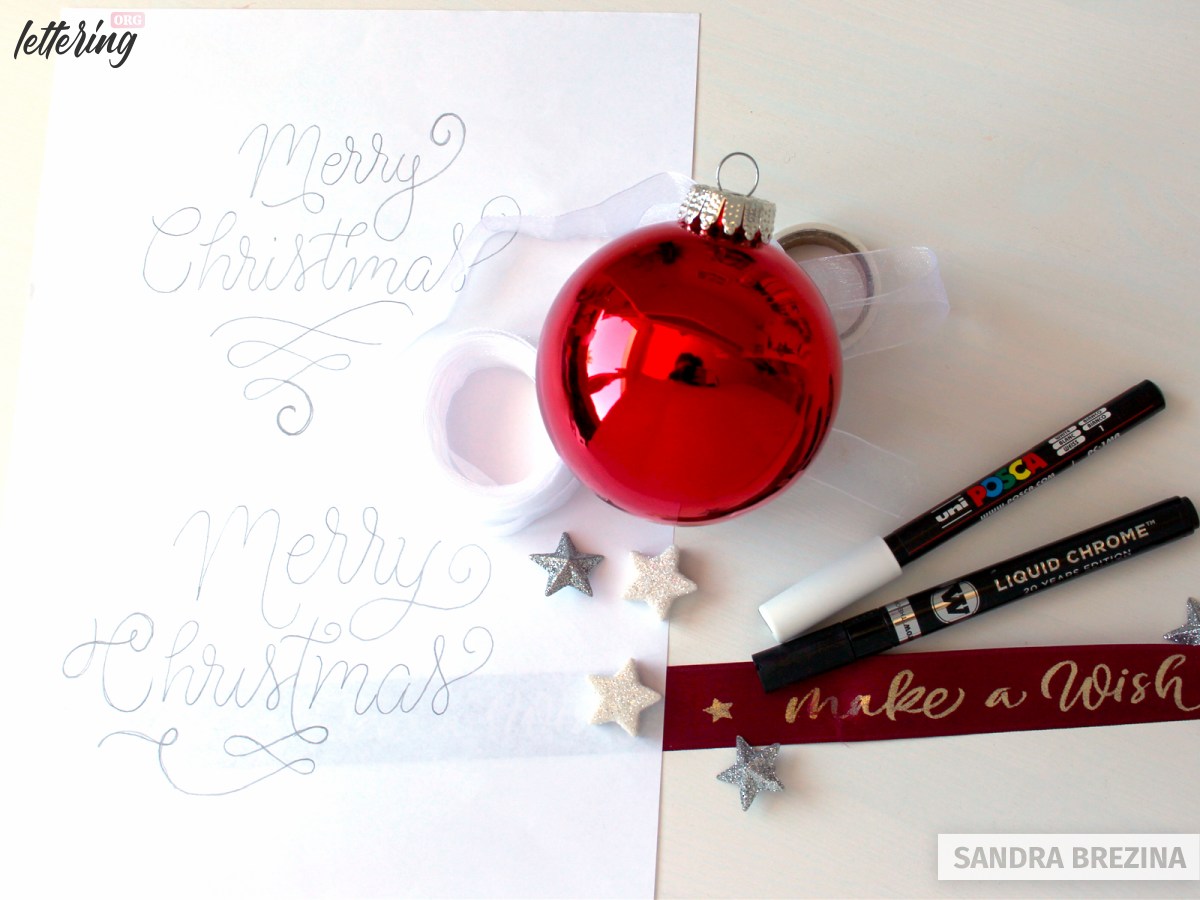
What you need
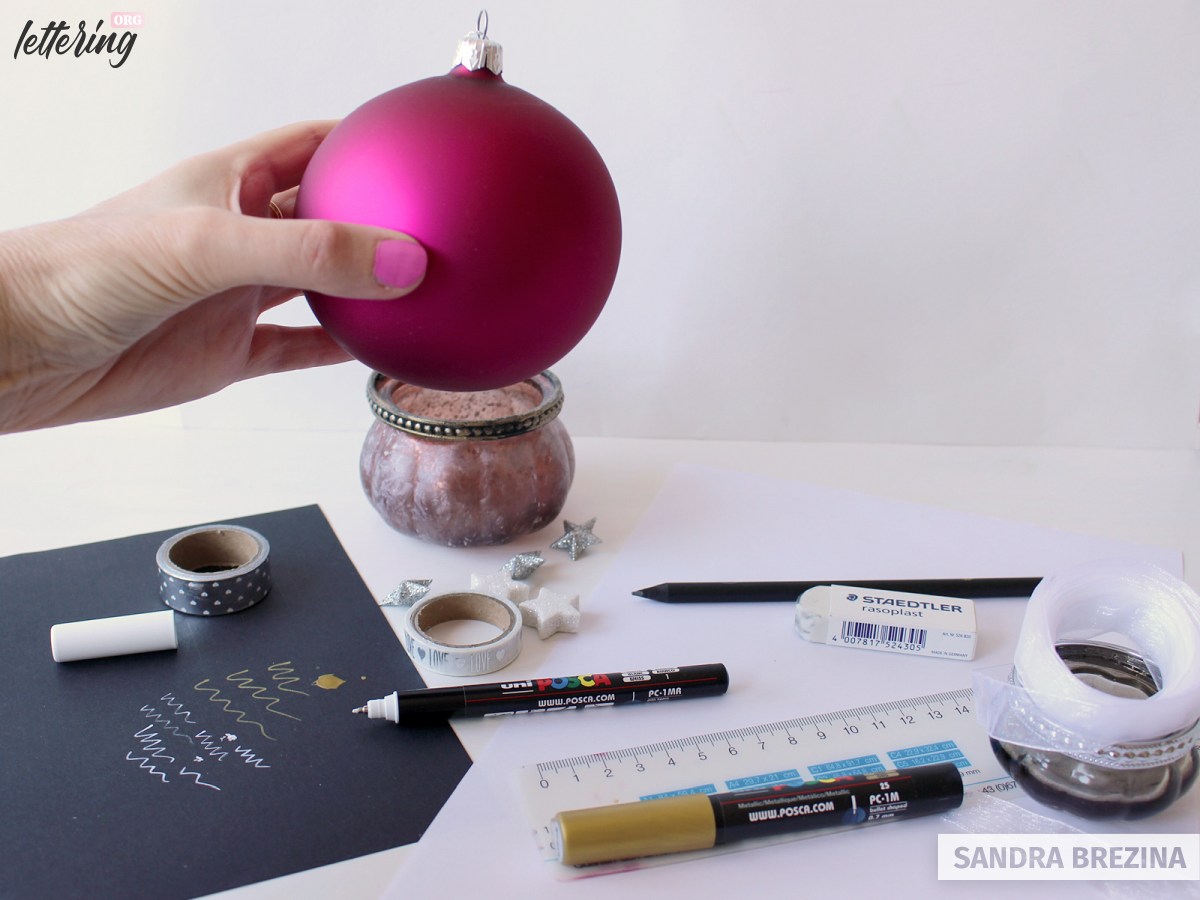
Christmas ornaments
First of all, you need to get the stuff to write on of course. I recommend to buy real glass products instead of plastic ones.
First, you have to decide whether you buy shiny or matte finish ornaments. Unfortunately, most sets have both versions inside. It is not only a matter of personal preference, but also a matter of permanence regarding your lettering.
I have made the experience that my hand lettering has much better permanence on matte finish ornaments. In addition, I love the beautiful opaque coverage. The acrylic paint markers I use give great coverage on both types of ornaments.
But you have to keep in mind: wrapping paper and even soft mechanical interactions may leave tiny scratches on letters that are written on shiny Christmas ornaments.
But if you want to use them for yourself to hang on your tree or give your home a very festive touch, the shiny ones are of course superb.
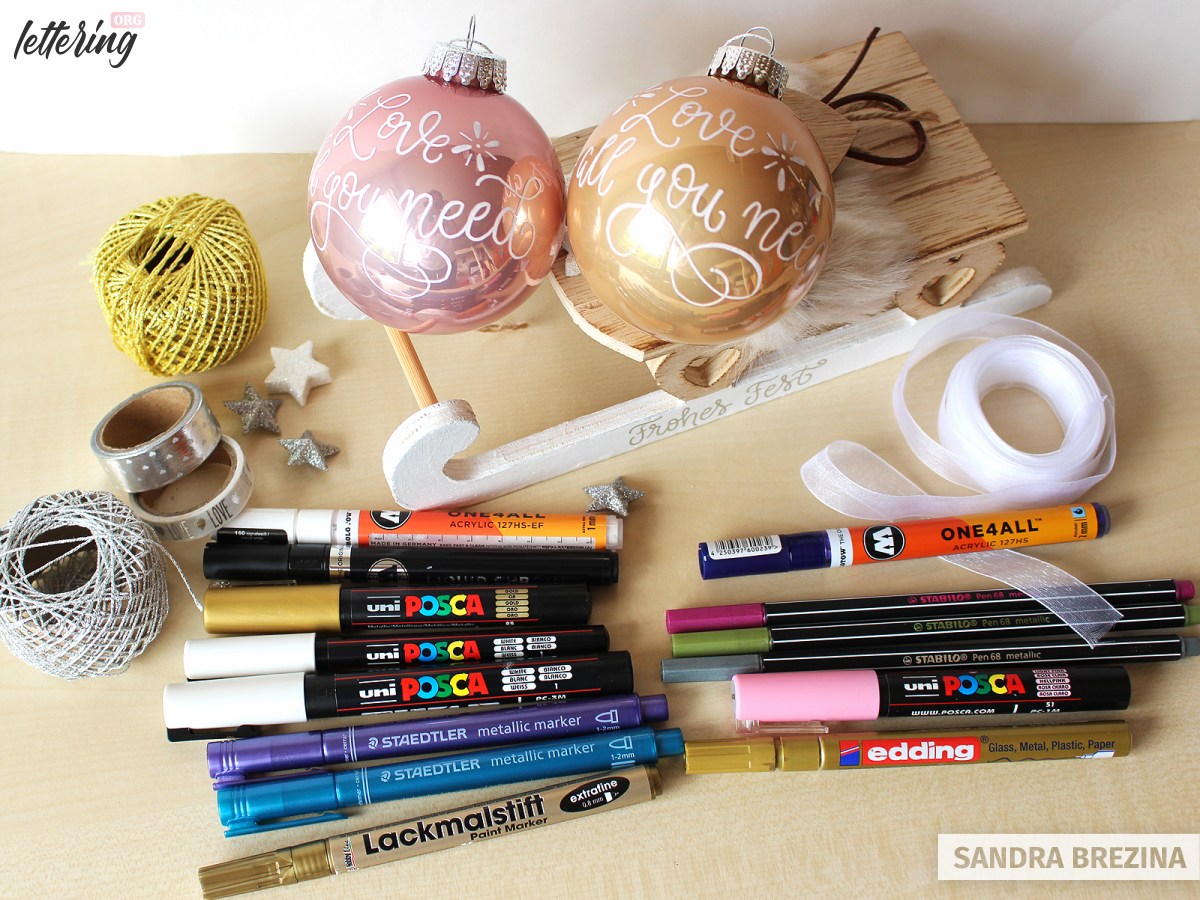
Art supplies
You do not need to have all of these paint markers and a washi tape available.
The enlisted tools here are the art supplies I have already worked with without having troubles for hours and hours writing at live lettering events.
However, my top favourite tools among all of these markers are the ones of Uni Posca and the very cool Molotow liquid chrome marker.
- Uni Posca paint marker* (pin type or bullet shaped fine point: 0.7 mm)
- Molotow acrylic paint marker ONE 4 ALL* (extra fine: 1 mm)
- Molotow liquid chrome* (1 mm pump marker)
- Glass paint marker* (0.8 mm)
- C.Kreul paint marker (super fine: 0.8 mm)
- Staedtler metallic marker* (bullet point: 1-2mm)
- Stabilo metallic pens*
- Pencil
- Scrap paper for your pencil sketches
- Black or very dark paper to test your acrylic markers
- Flexible ruler or flexible measurement tape
- Eraser
- Washi tape
- Small cup or something to place your ornament on top of it
Before you start to have fun, grab a micro-fibre cloth (or something similar) and clean your ornaments.
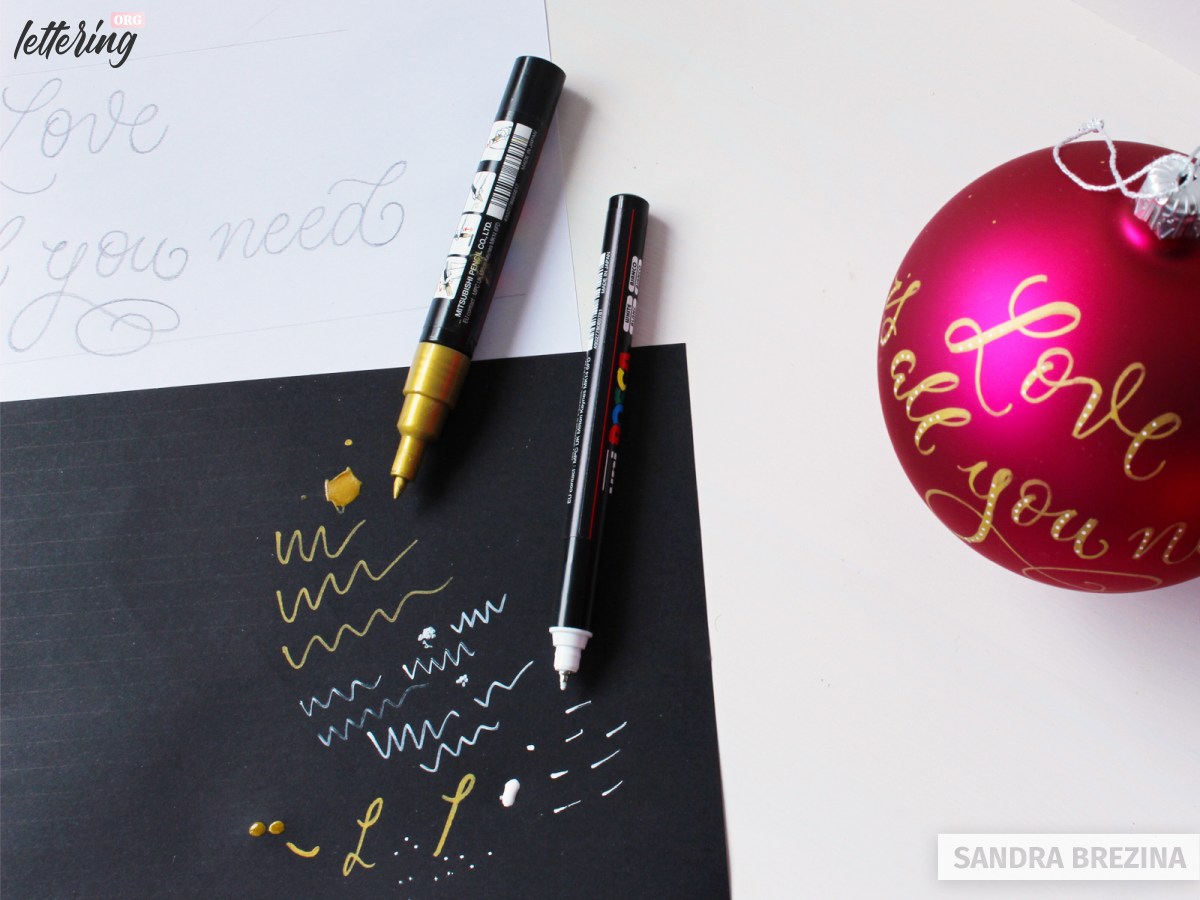
Always have a black or very dark scrap paper to control the flow capacity of your markers.
Sometimes, they tend to emit too much paint which may result in an unpleasant puddle. To avoid this to happen on your ornament, always make a few strokes on your scratch paper first.
Wash your hands to keep them free from any fat residues to avoid leaving any finger marks on the glass surface.
Let’s dive in!
Lettering on matte ornaments
Start with big Christmas ornaments
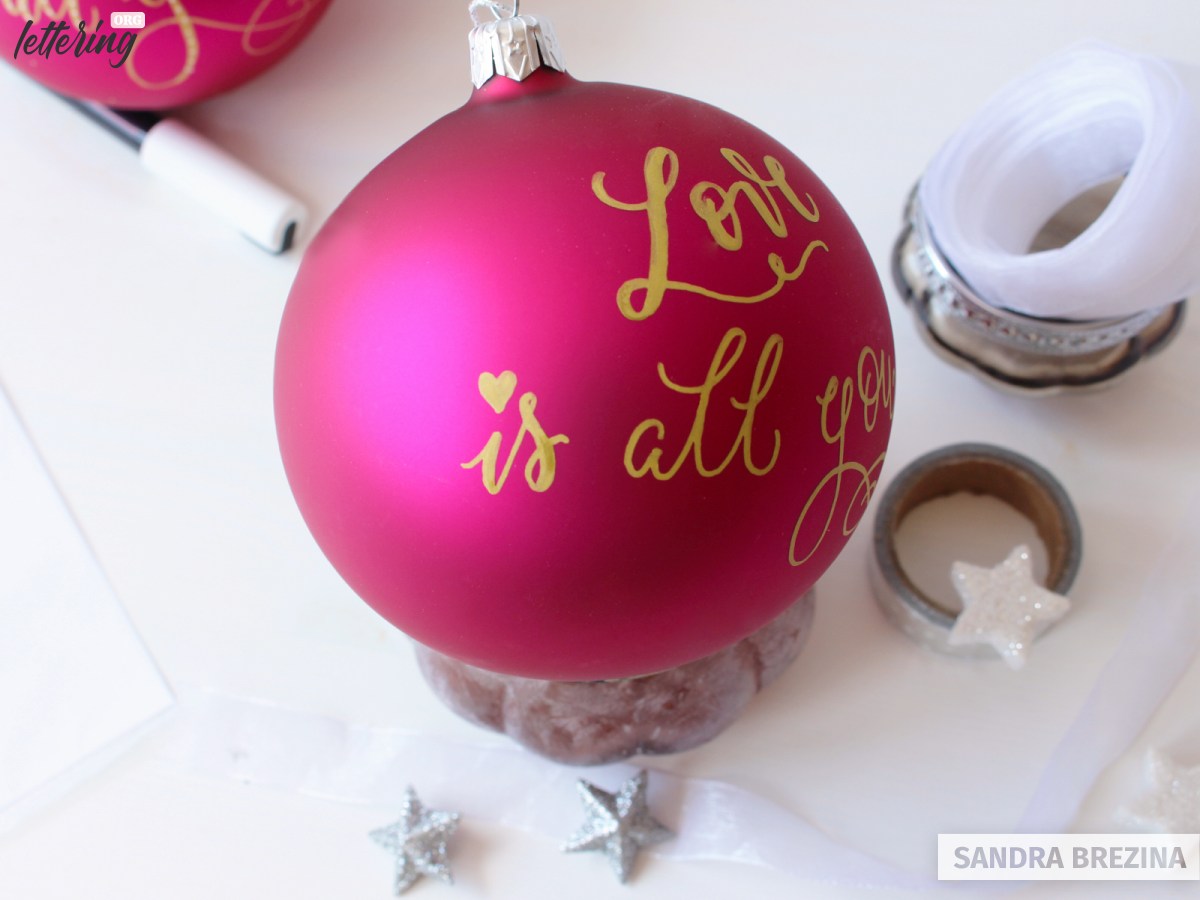
Keep in mind: it is easier to start with Christmas ornaments with large diameters (10 cm or more) since they offer plenty of space for your letters.
As you see on the picture, the Christmas ornament I use is larger than the palm of my hand.
Measure the area for your letters
Of course you can measure the space for your letters by eyeballing it, but I recommend to measure the approximate space if you do this process for the very first time.

This step is even more important if you plan to decorate the front and back sides. As you see on the picture, the front side offers an area of around 13 to 14 centimeters regarding the width.
Pencil sketches
I plan to place my hand lettering within a space of approximately 13 cm x 8 cm. Do not challenge yourself too much by writing too much words or rows on your first ornament.
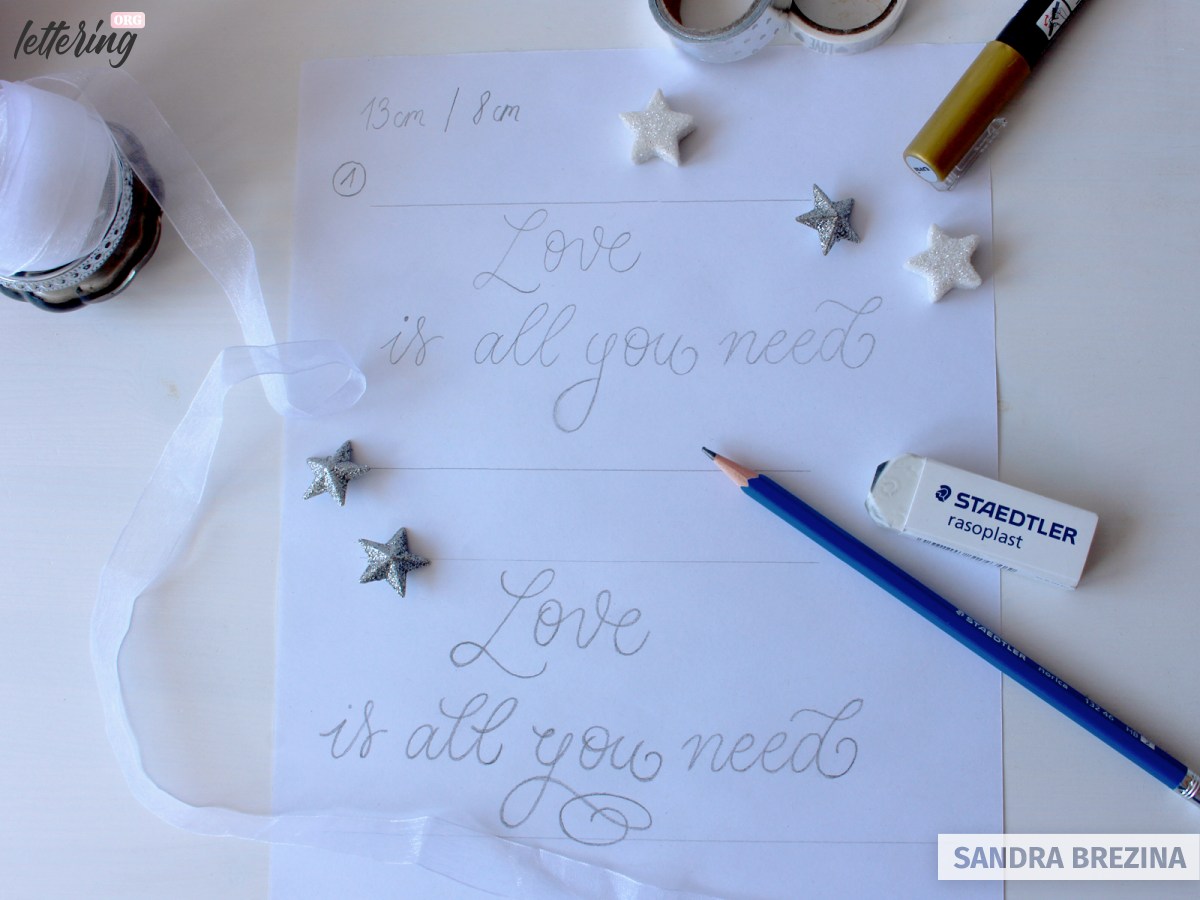
Try keeping your first project simple.
Lettering one large word or at least two rows of words which need to be well arranged is tricky enough.
The reason: You write on a curvy surface and need to rotate your ornament while you write on it.
My style of script lettering is very playful. I place flourishes wherever there is negative space to be filled in. In my first sketch, you see that the word „you“ lacks a playful flourish.
The reason is the following: When you incorporate flourishes in hand letterings made on ornaments, it is easier to write certain words „incomplete“ and add your flourishes afterwards because of the curvy surface.

It is not necessary to convert your monolinear drawn sketch into faux calligraphy on your scratch paper.
Keep in mind that your letters will get broader and need more space when you start thickening all your downward strokes to create a faux calligraphy style.
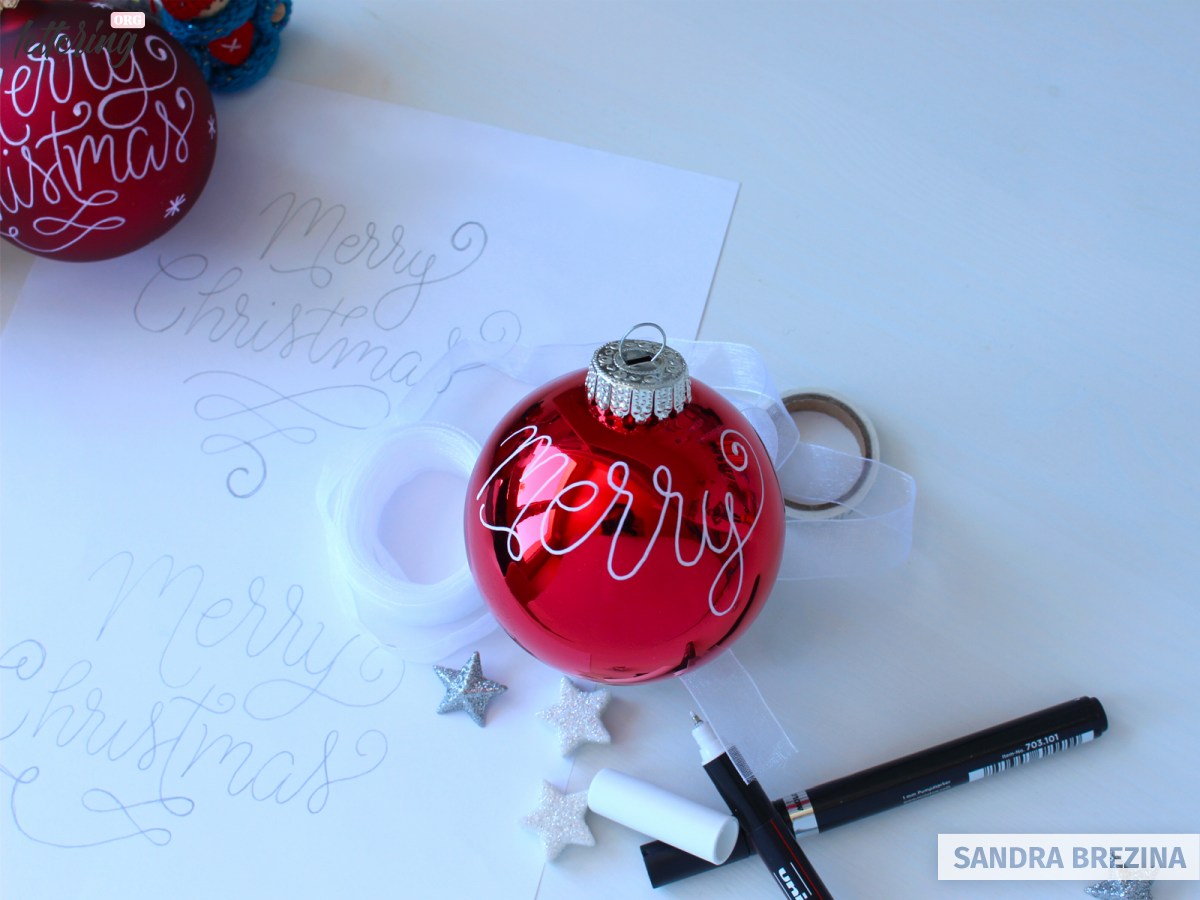
Transfer your sketch to the ornament
With your sketches, you get an idea of how to arrange your hand lettering on your ornament. You can use a washi tape that serves as your baseline and remove it afterwards.
I prefer to do this by eyeballing the appropriate space and start writing the first row or let’s say word with a gold Uni Posca paint marker.
Since paint markers do not provide you with brushpen tips, your hand lettering is just monolinear, but we will fix this in the next step.

When you write on a curvy surface for the first time, it seems a bit difficult to adjust your lettering accordingly.
My tip for you: Write very slowly. Write the first two letters, then stop and evaluate the position of your third letter by eyeballing.
It is better to place your first row more above than below. The reason for this: You need enough space for your second row of words to follow. If they are lettered too far down, you cannot read them well when the ornament hangs in the tree.
From monolinear to faux calligraphy
As you see on the picture, I use a small glass container to put down my Christmas ornament whenever I need my hands to test my markers or create my sketches.
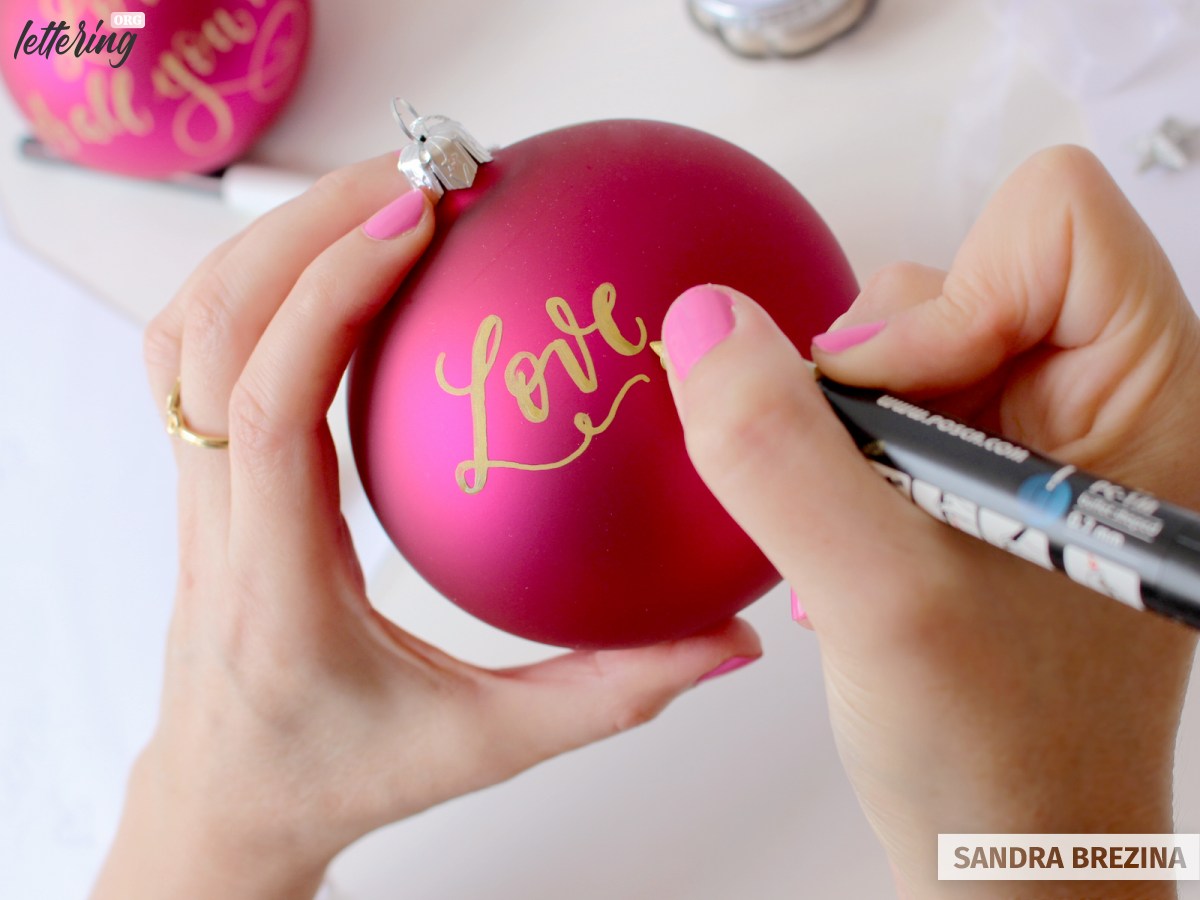
To write on my ornament, I hold it with my left hand and write with my right hand. The desk supports my left elbow in order to stabilize my arm and prevent my writing from getting shaky (for lefties: please do this process the other way round).
Grab your paint marker and thicken your downward strokes to give your lettering a fancy faux calligraphy look.
Adding the second row
Wait a few seconds to let your writing get dry. Then proceed with your second row in monolinear style and keep your arrangement as close to your refined sketch as possible.
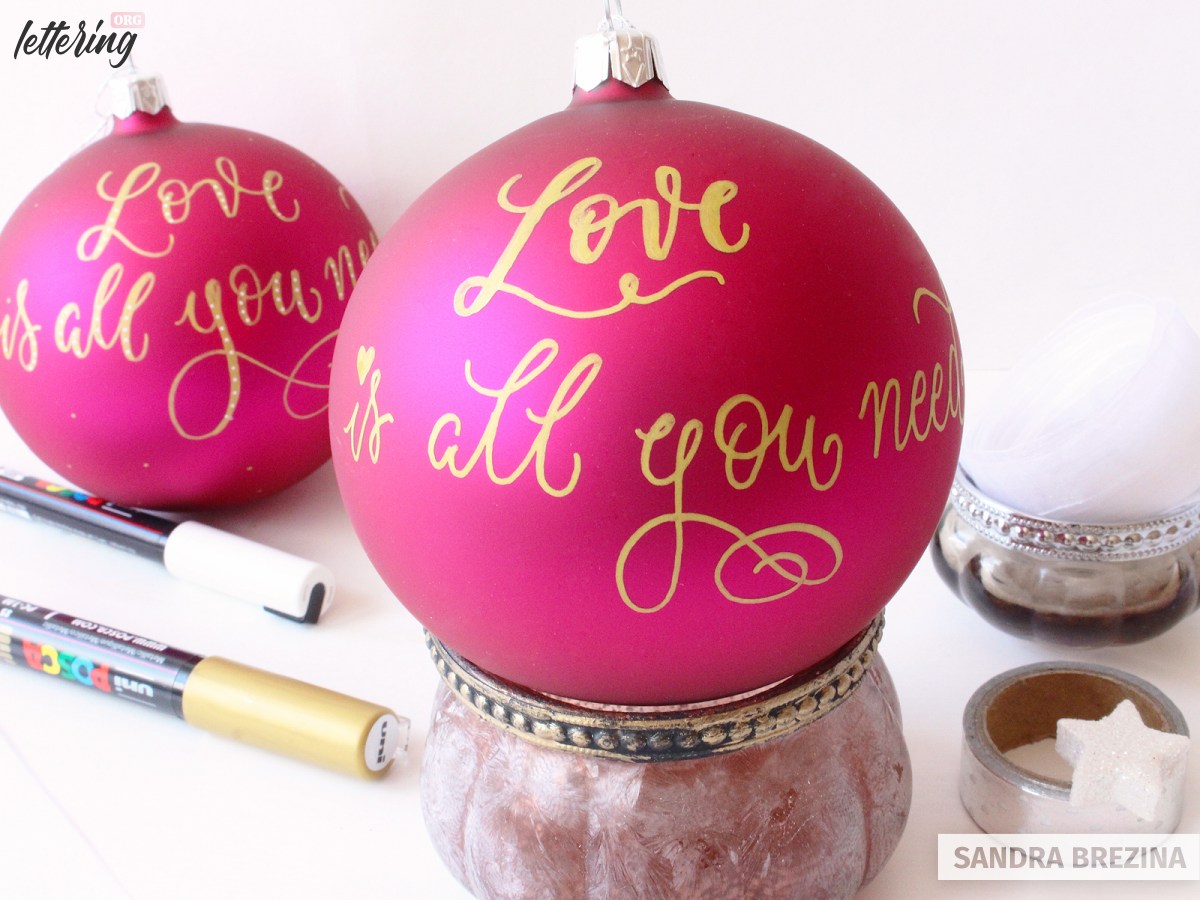
Complete your lettering with faux calligraphy
Broaden your downward strokes once again to complete your faux calligraphy.
Add some decoration
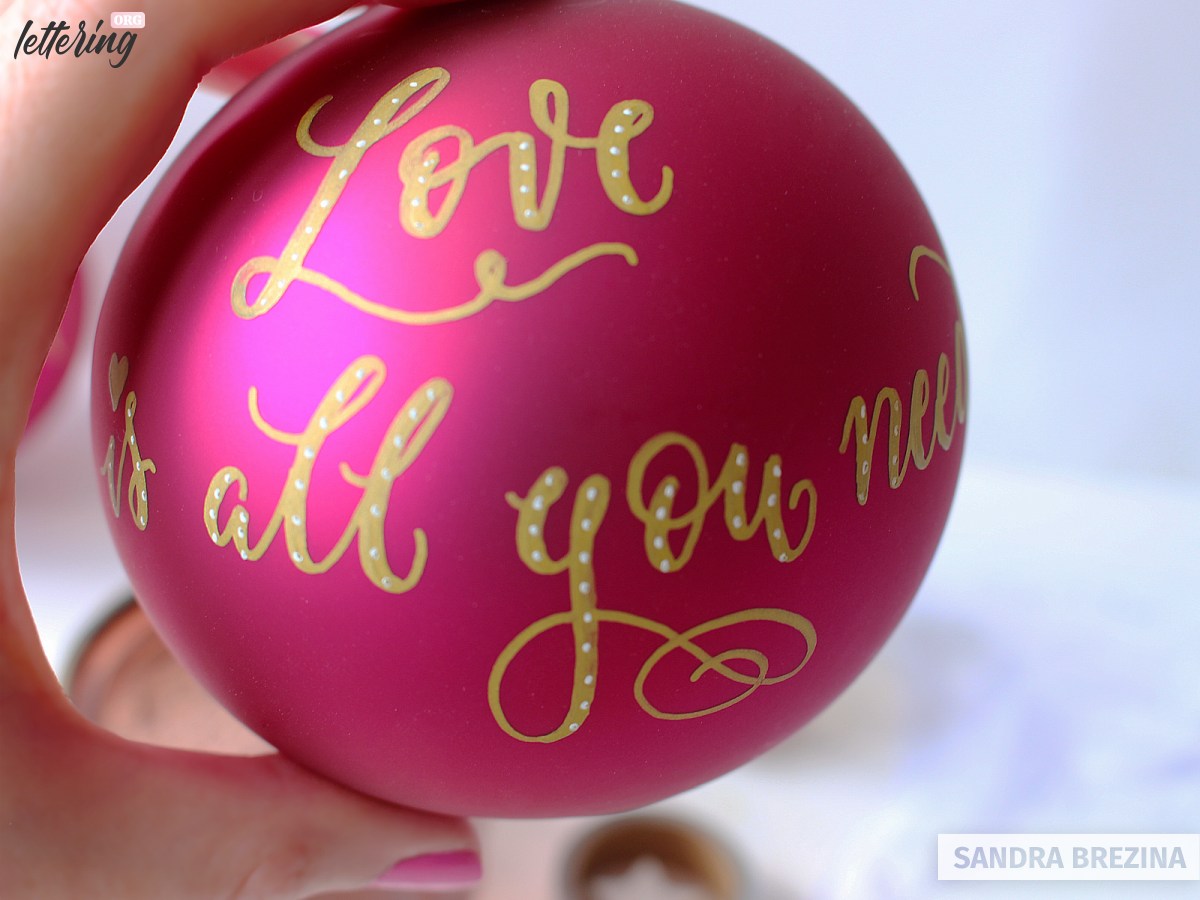
The Uni Posca paint marker leaves a beautiful more than semitransparent gold cover on the ornament which is very beautiful.
However, I love to give my handmade Christmas ornaments a real boost by adding tiny little dots with a white Uni Posca. This makes them very unique and emphasizes the gold coverage.
Repeat all steps to decorate the back side
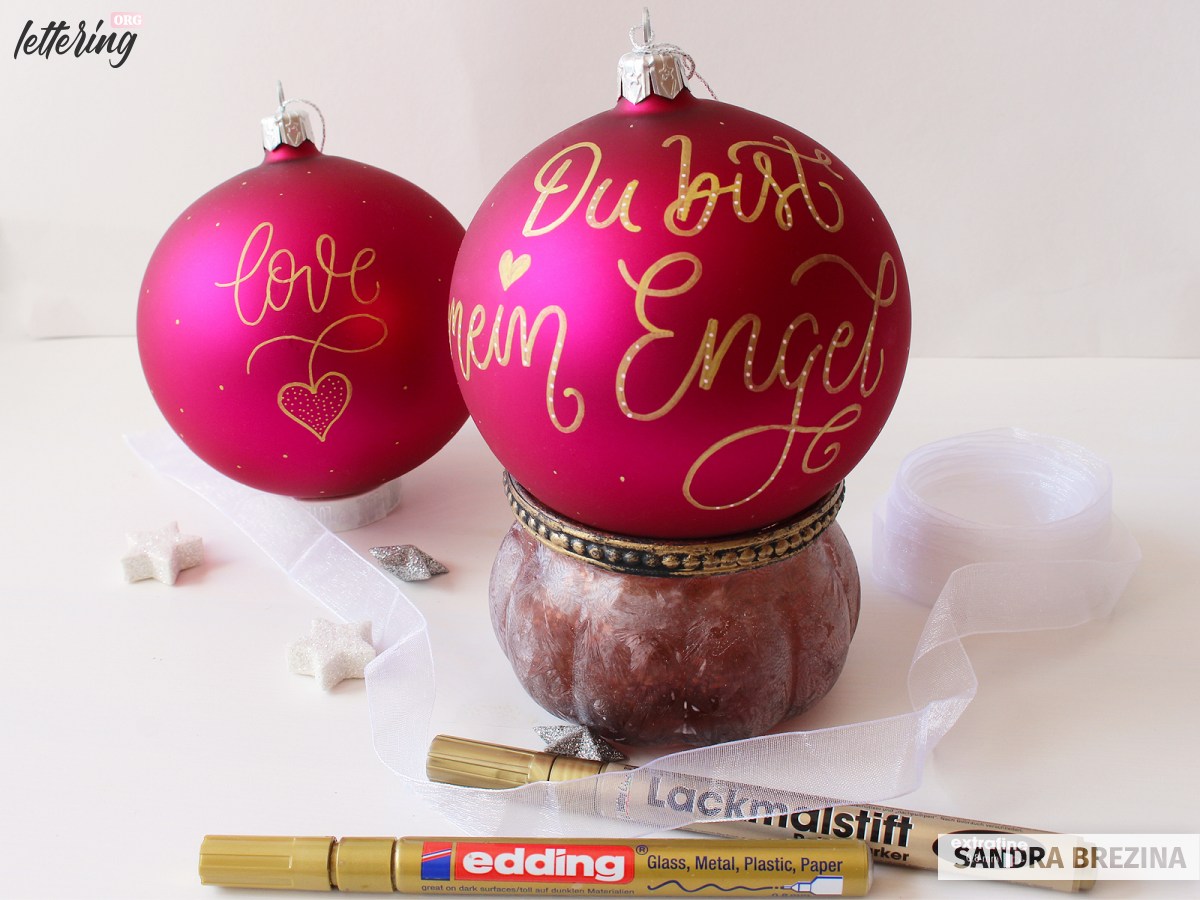
Christmas ornaments with large diameters have the advantage that there is sufficient space to decorate the back side as well.
Repeat all the previous steps and enjoy creating very unique and amazing ornaments.
Yeah – this is the last step
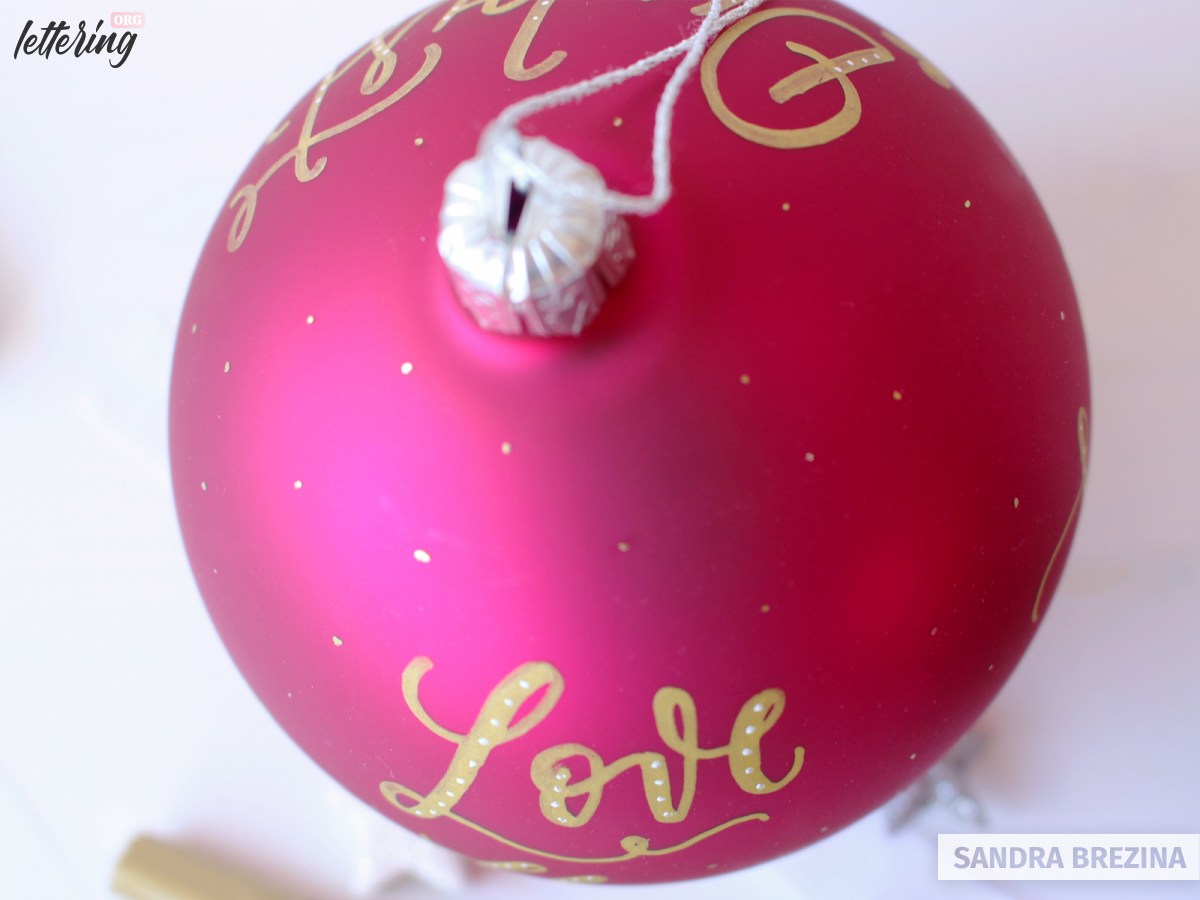
As soon as my lettering is complete and dry, I love to add further elements to make my ornaments sparkle like diamonds.
Dots are very simple but when they are reflected by artificial light, they shine a lot and are a very decent add-on.
For creating my spots, I use tools with a more sparkling coverage, for example: Edding or C.Kreul markers. I do not prefer them when it comes to writing since they are to some extent quite „rebellious“.
However, for adding small elements, they are really great.
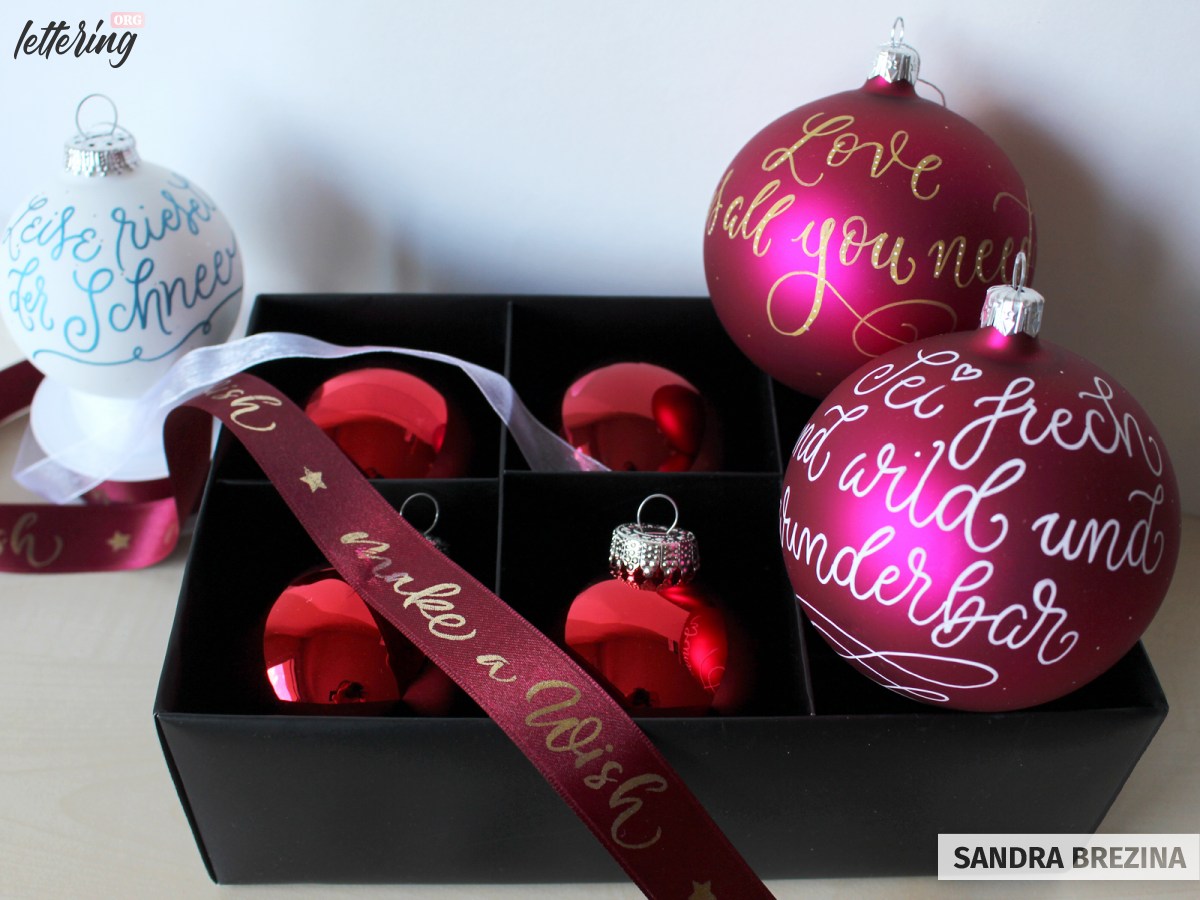
Lettering on shiny ornaments
Let us proceed with smaller ornaments
Most Christmas ornaments have a diameter of around 7 to 8 centimeters. So let us create our second project with this smaller size.
This time, I am going to use a shiny ornament.
Remember: the result is the same as if you letter on matte finish ornaments, but the permanence of your acrylic markers is to some degree reduced.
Maybe you can increase the permanence with fixative sprays. I must admit I have not yet tried this approach.
Make your sketches
Start with drawing your sketches. Decide whether you proceed with monolinear letters or faux calligraphy.
If the latter is the case, keep in mind to leave sufficient space to thicken your downward strokes in the second step.
Create a high contrast
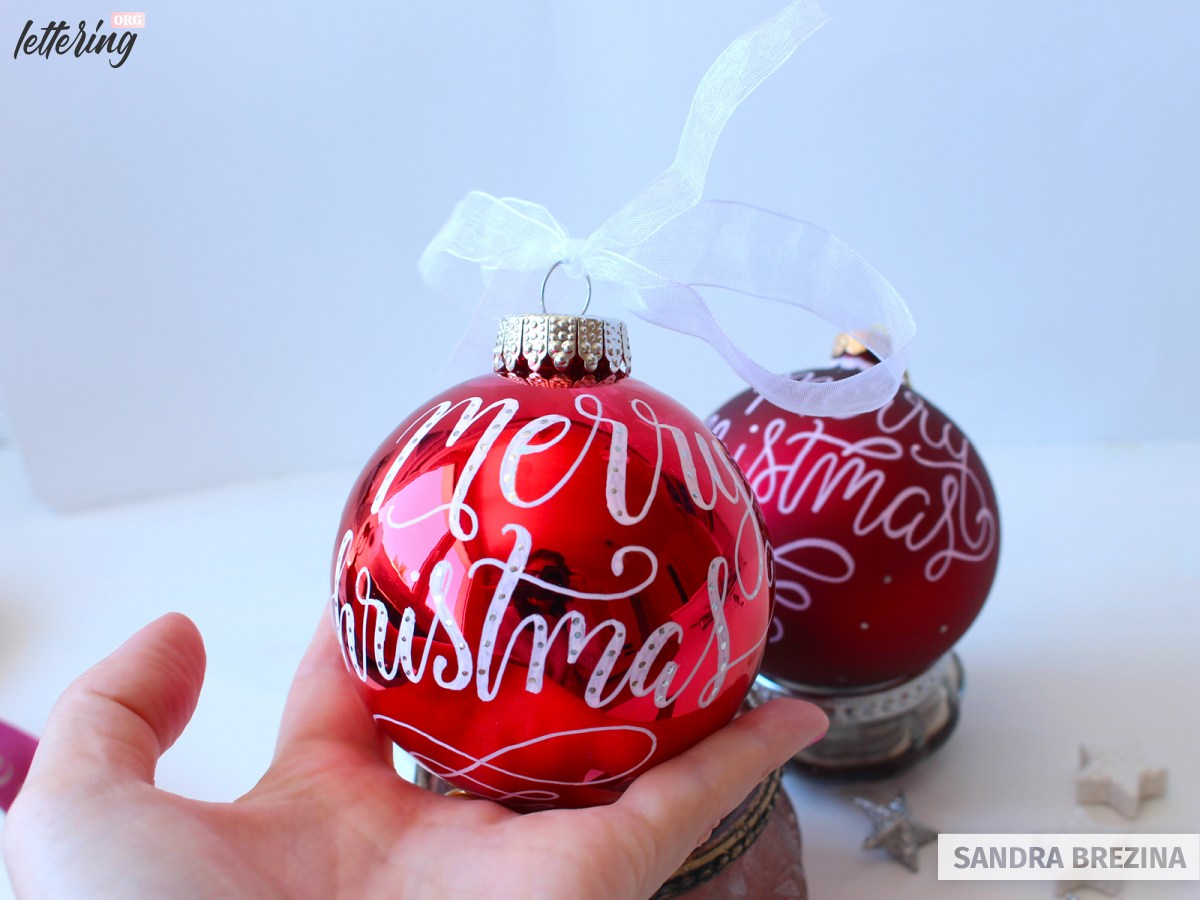
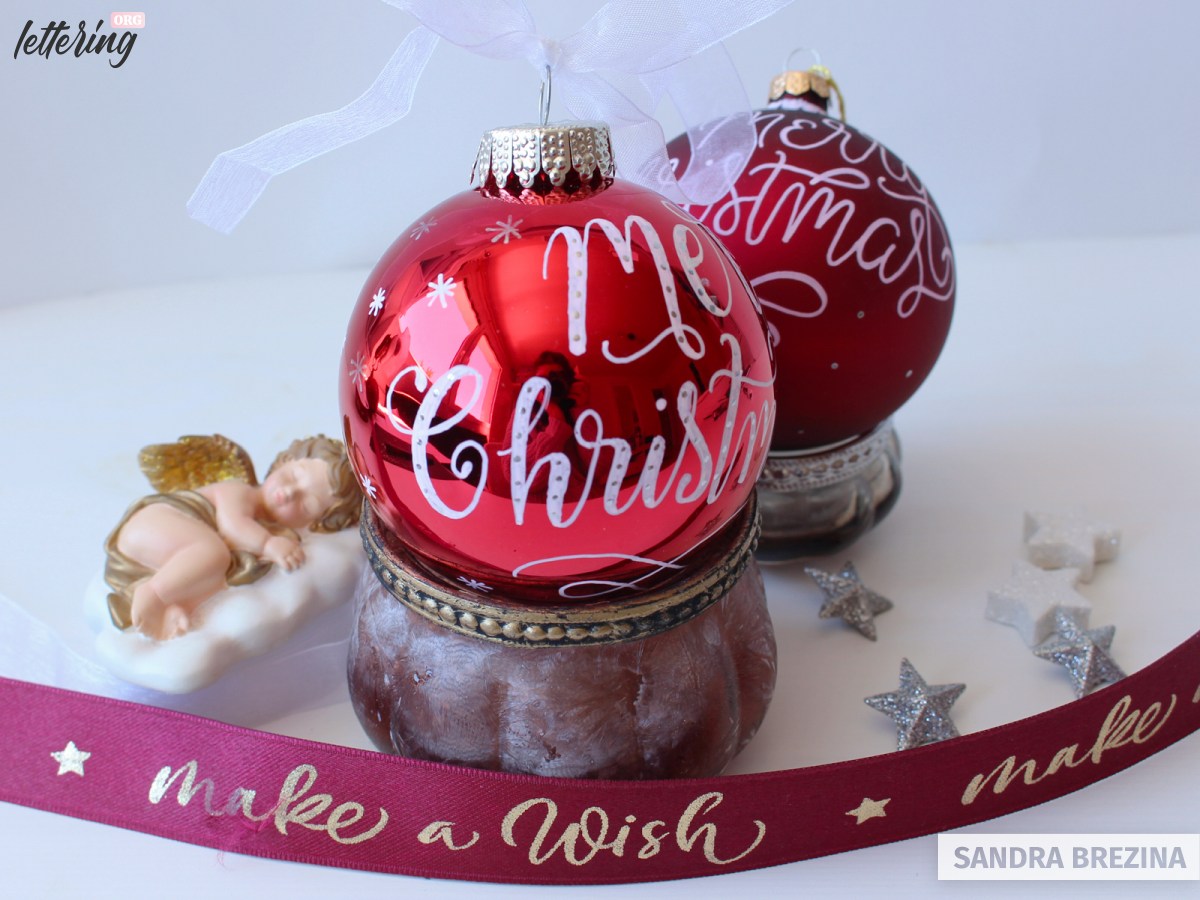
To make your letters pop from the shiny background, choose a color that creates a high contrast. As you see on the photo, I use a white Uni Posca here (pin type: 0.7 mm).
It leaves a gorgeous opaque coverage on the vibrant red surface.
Complete your arrangement
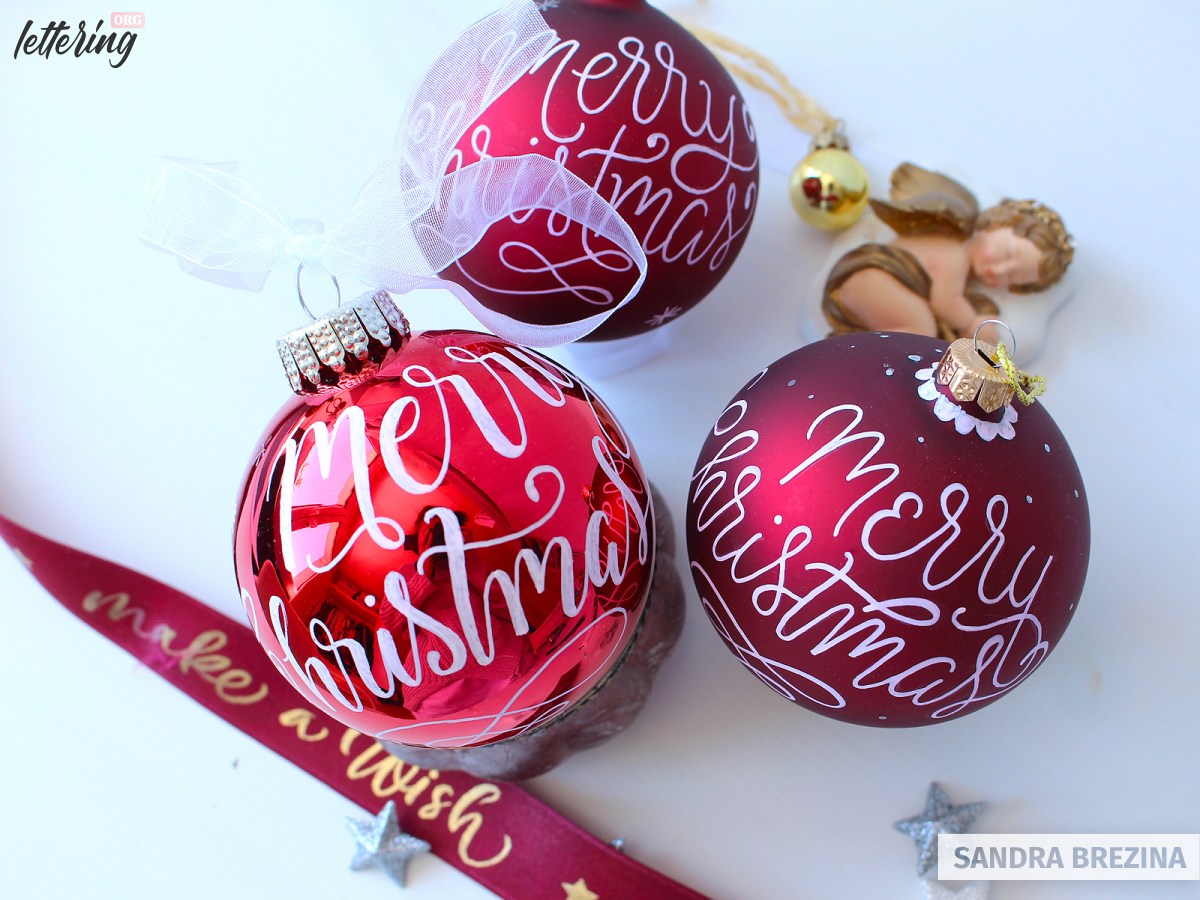
As you can see, I made three Christmas ornaments with monolinear hand lettering. The darker ornaments have a matte finish surface.

Thicken your downward strokes
In my opinion, the lettering is more outstanding on the matte finish ornaments than on the shiny one. So, I decide to turn my lettering into faux calligraphy by adding thick strokes to my letters.
My secret: liquid chrome
You are nearly done with your second project! On top of my letters, I love to add tiny dots with a Molotow liquid chrome marker.
These silver shining points look like tiny pearls and are a perfect match to the shiny surface. You will notice this as soon as light beams hit these dots. It’s like magic.
Optimize your design
As final step, I take my white Uni Posca and my Molotow liquid chrome markers and draw tiny snowflakes on the surface of my ornament to complete my design and fill in some negative space of my hand lettering.
Further inspiration
A modern look
In the previous two projects, I used traditional colors such as gold, white and silver. However, if you switch to a vibrant pinkish colour and letter a funny quote, your Christmas ornament will automatically get a very fresh and modern look.
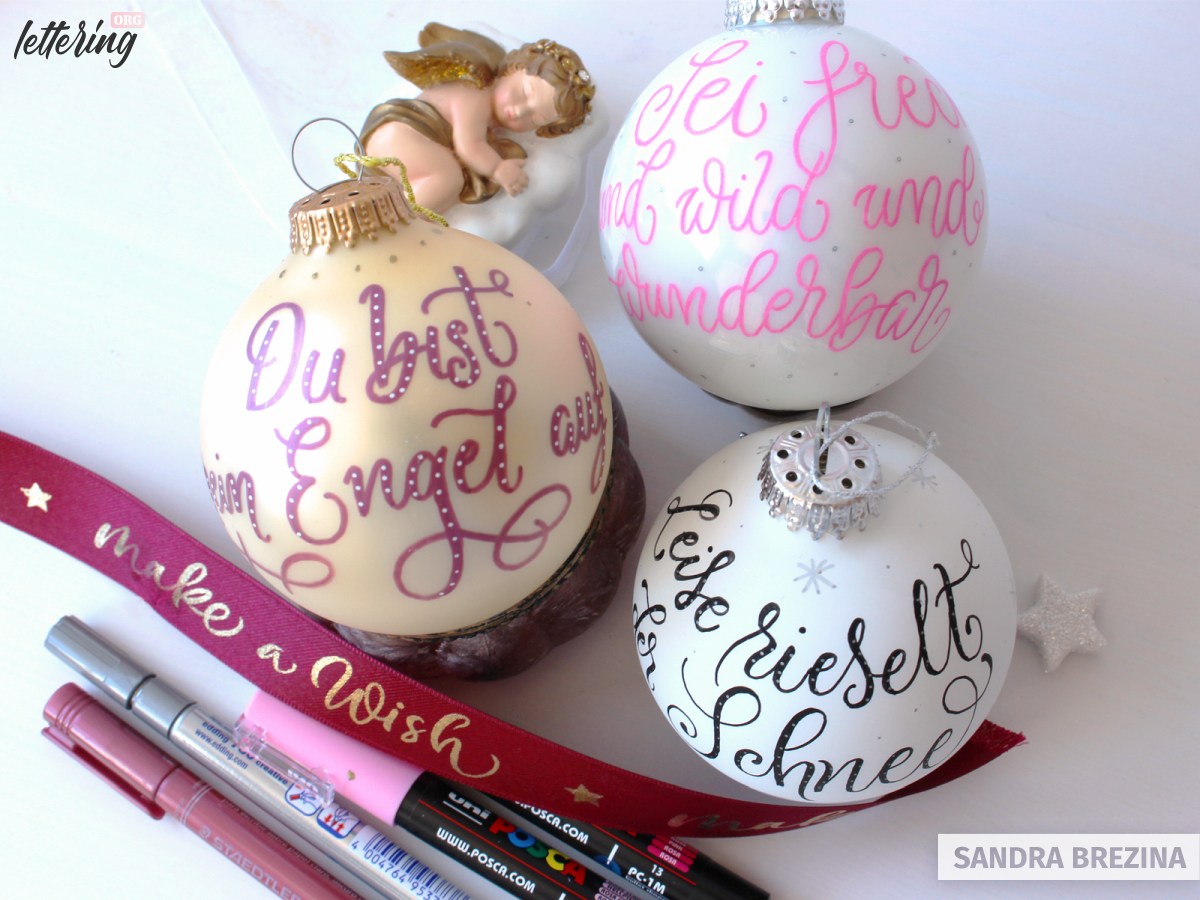
As soon as you are used to write on curvy surfaces, quotes of even three rows won’t pose a problem. In addition to my beloved acrylic markers, I used a Staedtler metallic pen in dark pink on the creamy Christmas ornament you see on the left side of the picture and added tiny white spots on top of my lettering to make it shine.
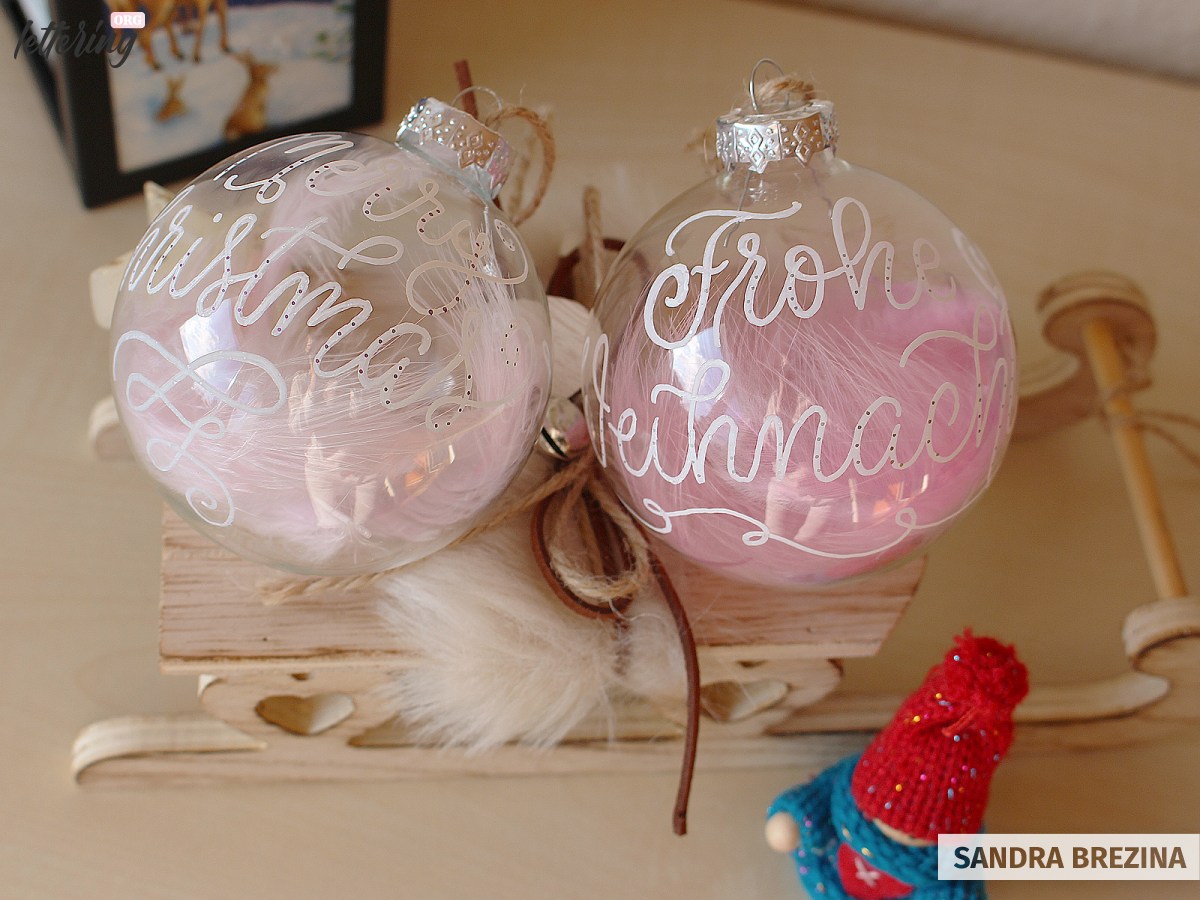
Transparent lettered ornaments
For my transparent ornaments, I used a white Uni Posca acrylic painter for my lettering and a dark pink marker to draw little dots. You can fill your ornaments with feathers, confetti, tiny stars made of foil, and so on.
Personalized ornaments
Personalized ornaments are a great idea to surprise your guests when they take their seats at your festive table. You can use your ornaments as charming place cards so to speak.
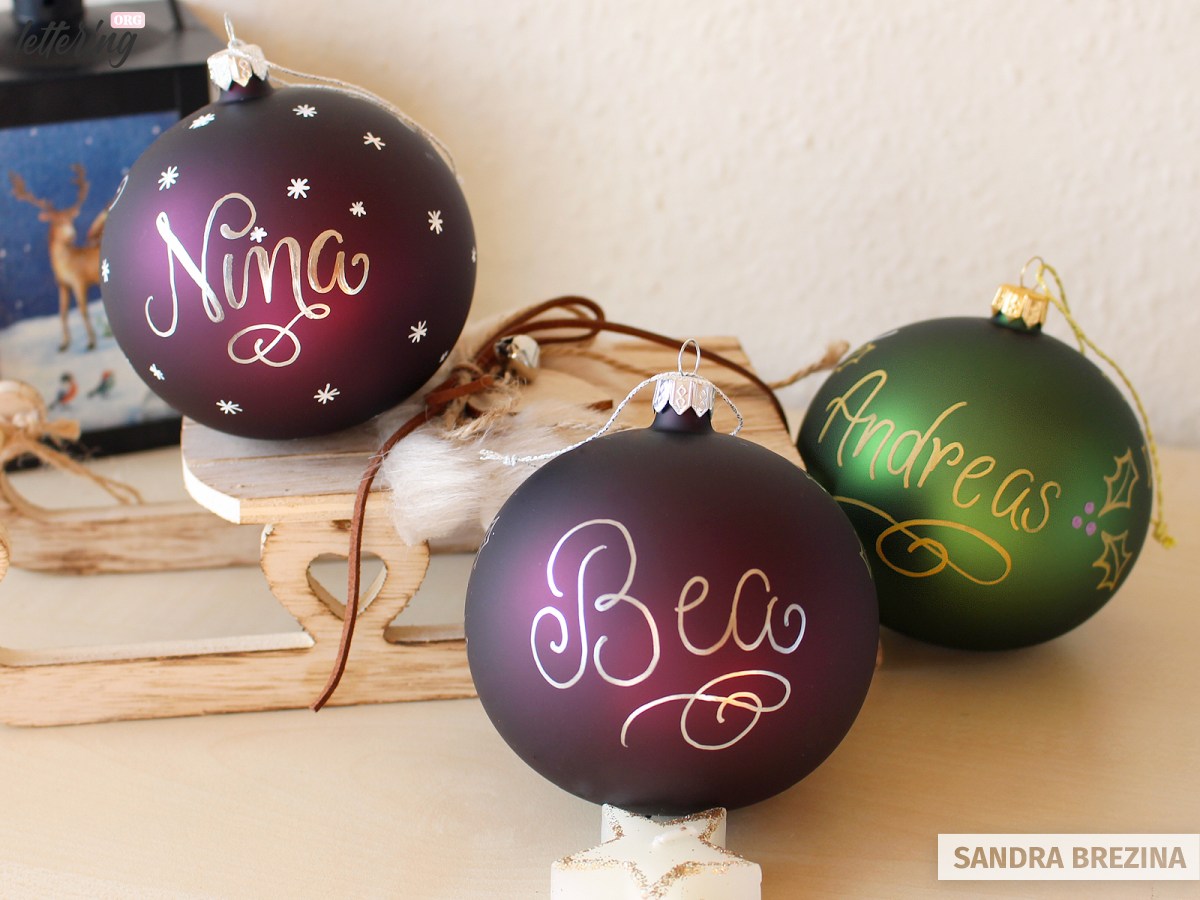
I have already mentioned the Molotow liquid chrome marker as a tool to decorate your letters. Here I used it to write on my ornaments which gives them a very stylish and cool look.
Bonus: Packaging
Let us create a unique gift wrap
If you intend to offer your handmade ornaments as Christmas gifts, I would like to share my idea with you for creating your own gift wrap.
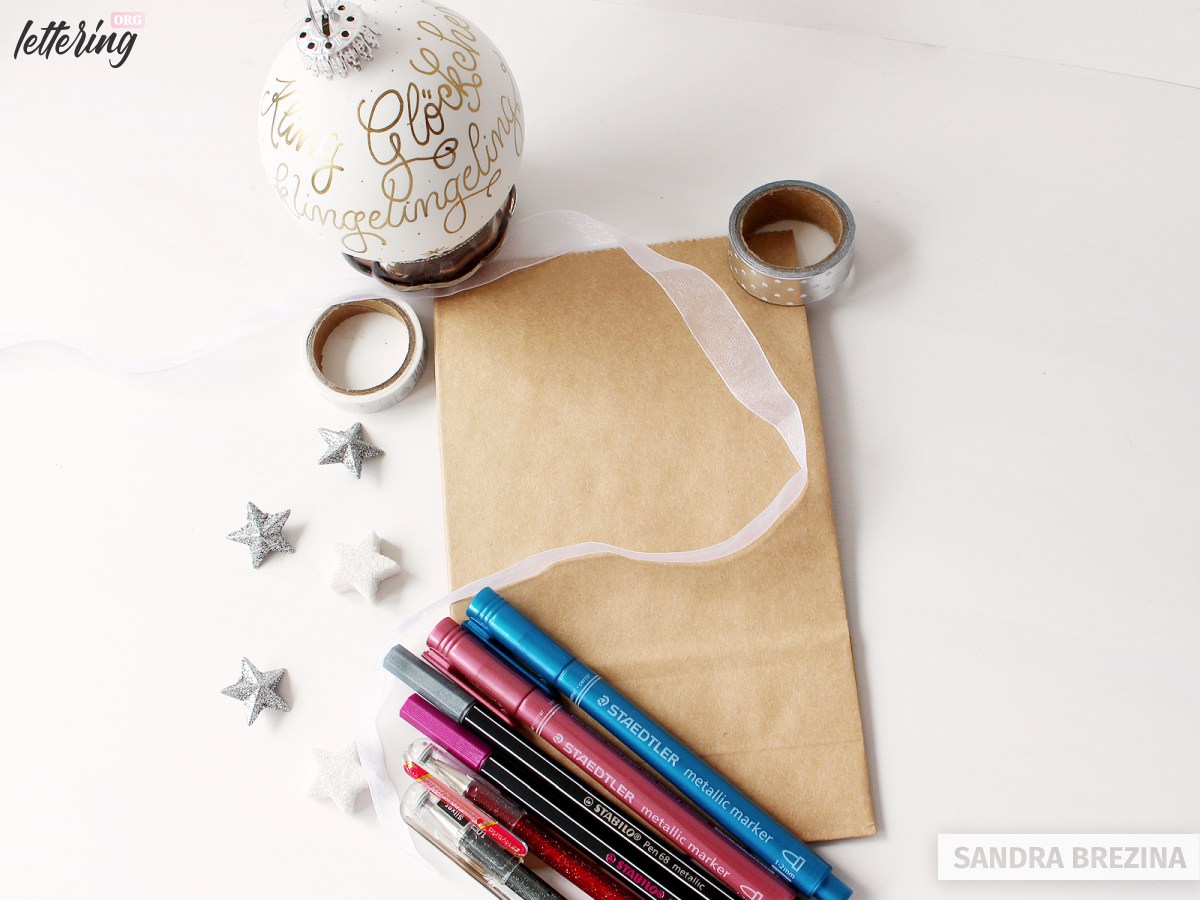
Art supplies
- craft paper bag (12 x 20 cm)
- various pens that sparkle (e.g. Staedtler metallic marker, Stabilo metallic pens, Pentel metallic gel rollers)
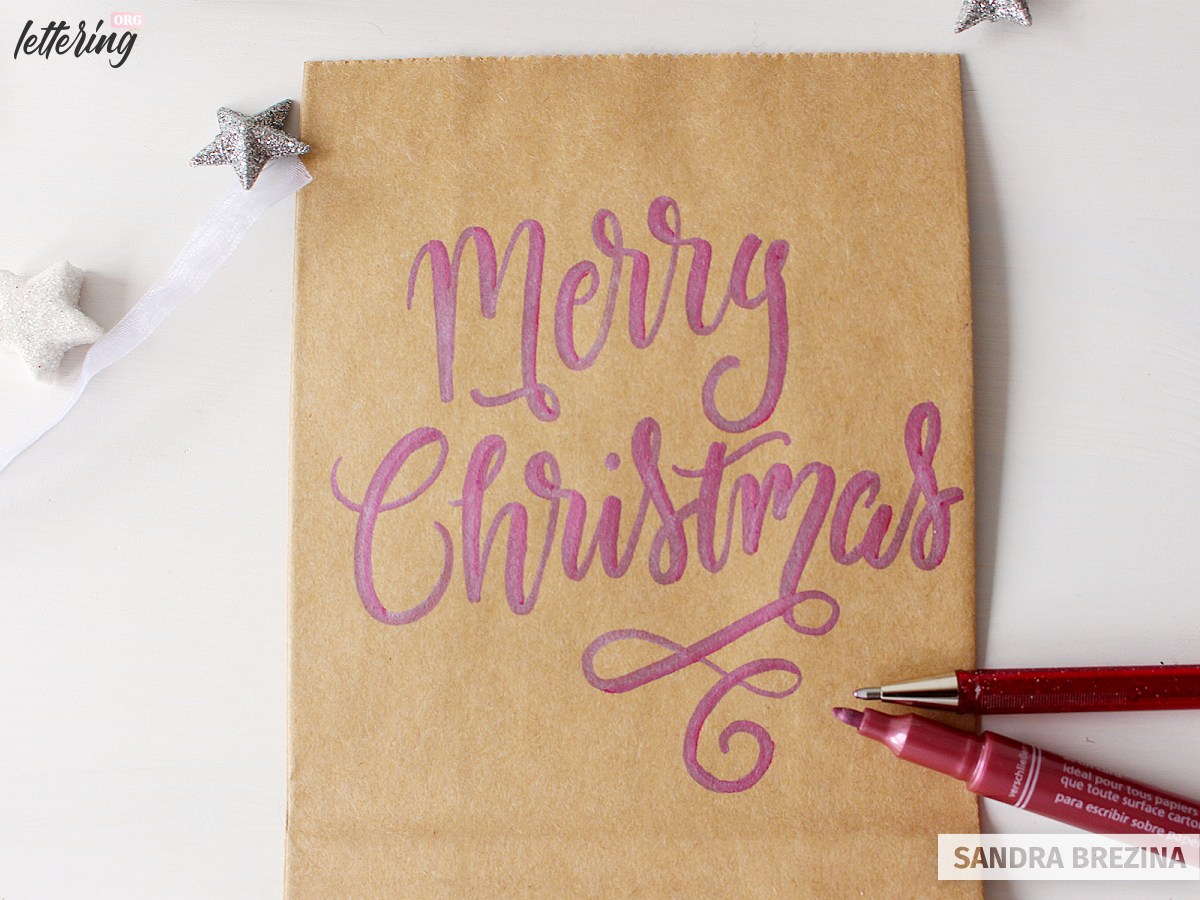
Letter your first layer
First, I grab a pink Staedtler metallic pen and letter „Merry Christmas“. I like the combination of the brown paper and the pen’s smooth coverage.
However, if you prefer to generate a more sophisticated look, choose a white paper bag or try your design with other types of paper bags.

Make your second and third layers
Then, I take a vibrant pink Pentel gel roller and follow the right contours of all my letters and draw a pinkish outline. Since this outline results in a very striking outcome, I grab my Staedtler metallic pen once again.
I follow the still wet pink line of the Pentel gel roller and draw directly above it to blur or smooth the colors. The final result is a very decent darker pinkish outline that pops from the craft paper.
Final result
Last step: I take a silver shining Pentel metallic pen and draw a line in the middle of each letter to make my lettering shine and emphasize its appearance.
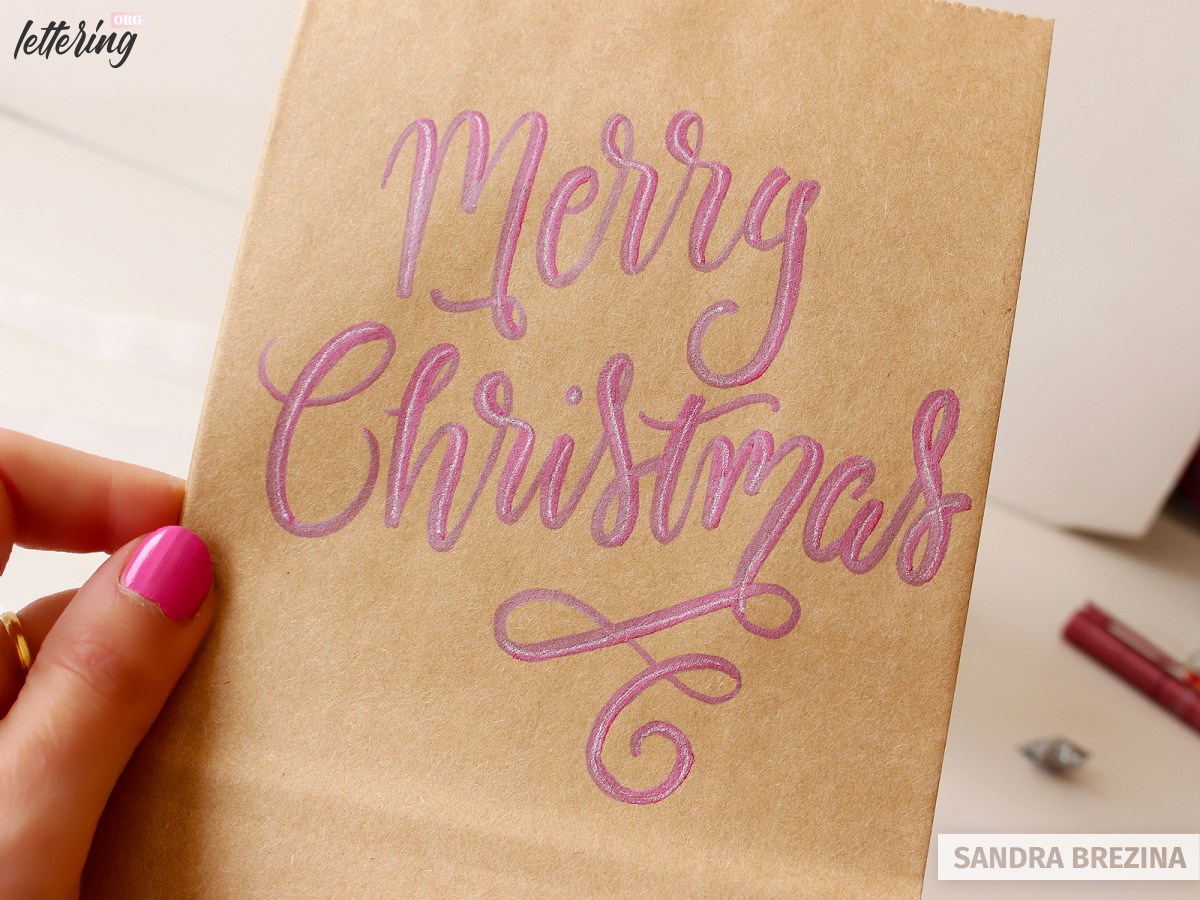
Then, I draw shining dots all over the bag. Optional: You can make holes into your craft paper bag and thread some lovely band through them.

Final words
I really hope that you had fun in reading this tutorial and creating your own hand lettered Christmas ornaments.
Maybe you also dived into the process of making your Christmas gift wrap. Keep trying different tools, colors, types of ornaments and quantities of words in order to push your creative boundaries.
Stay amazing!
Hello, this information and product are very amazing!
Thanks, for providing this useful information. If you want any query about Christmas Ornaments visits my site.
These are simply beautiful – thank you so much for the detailed instructions. It was especially helpful to know exactly what tools you look – that is very generous –
I’m going to start my Holiday gifts now!!